Customizer
Events Archive Page Header
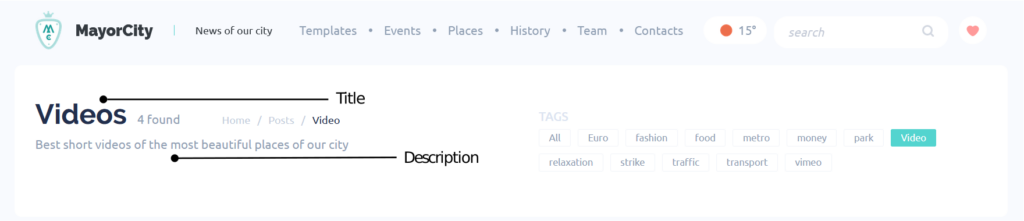
To set up or change the settings of Events Archive Page Header navigate to Appearance > Customize > Events. Here you can change or set title of events archive page header and describe the purpose of the page.
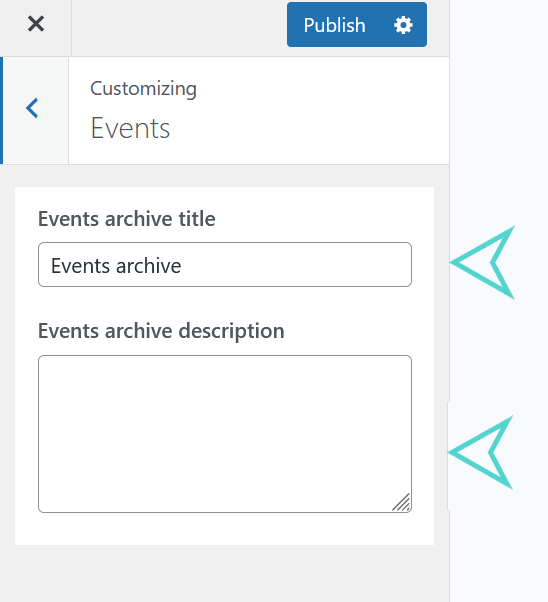
To change or set title of the page use Events archive title input.
To write the archive page description use Events archive description input.

Site Identity
To set up Site Identities navigate to Appearance > Customize > Site Identity . Here you can change the following settings of your site:
- Site Title
- Type your website title
- Tagline
- Type your website tagline
- Site icon
- Select an Image from Media Library or upload a new one.

Logo
To set up a Logo navigate to Appearance > Customize > Site Header > Logo from WordPress Dashboard. Then, Select an Image from Media Library or upload a new one.
Here you can choose Width options for Desktop, Tablet and Mobile sites.
To setup a Retina logo, you need to upload 2x bigger image than the Width option is set, for ex: if the Logo image width(x dimension) is 400px, then you should set Width option to 200px.
Weather widget
To set up Weather widget navigate to Appearance > Customize > Site Header > Weather widget. You can Show/Hide Weather widget, use Show weather checkbox for that.
To be displayed Weather widget needs API KEY and name of the city, to set up follow the following instructions:
- City
- Format of the city must be as shown in example image. But, if you need more information you can find in the website of OpenWeather.
- Api Key
- In order to get API KEY you should register in the OpenWeather site and get API KEY following their instructions.
- Caching time
- It is a time period for renewal of the weather data.

Homepage Settings
A home page is the front door to your site. Using the steps in this guide, you can change your home page to any page you’ve created.
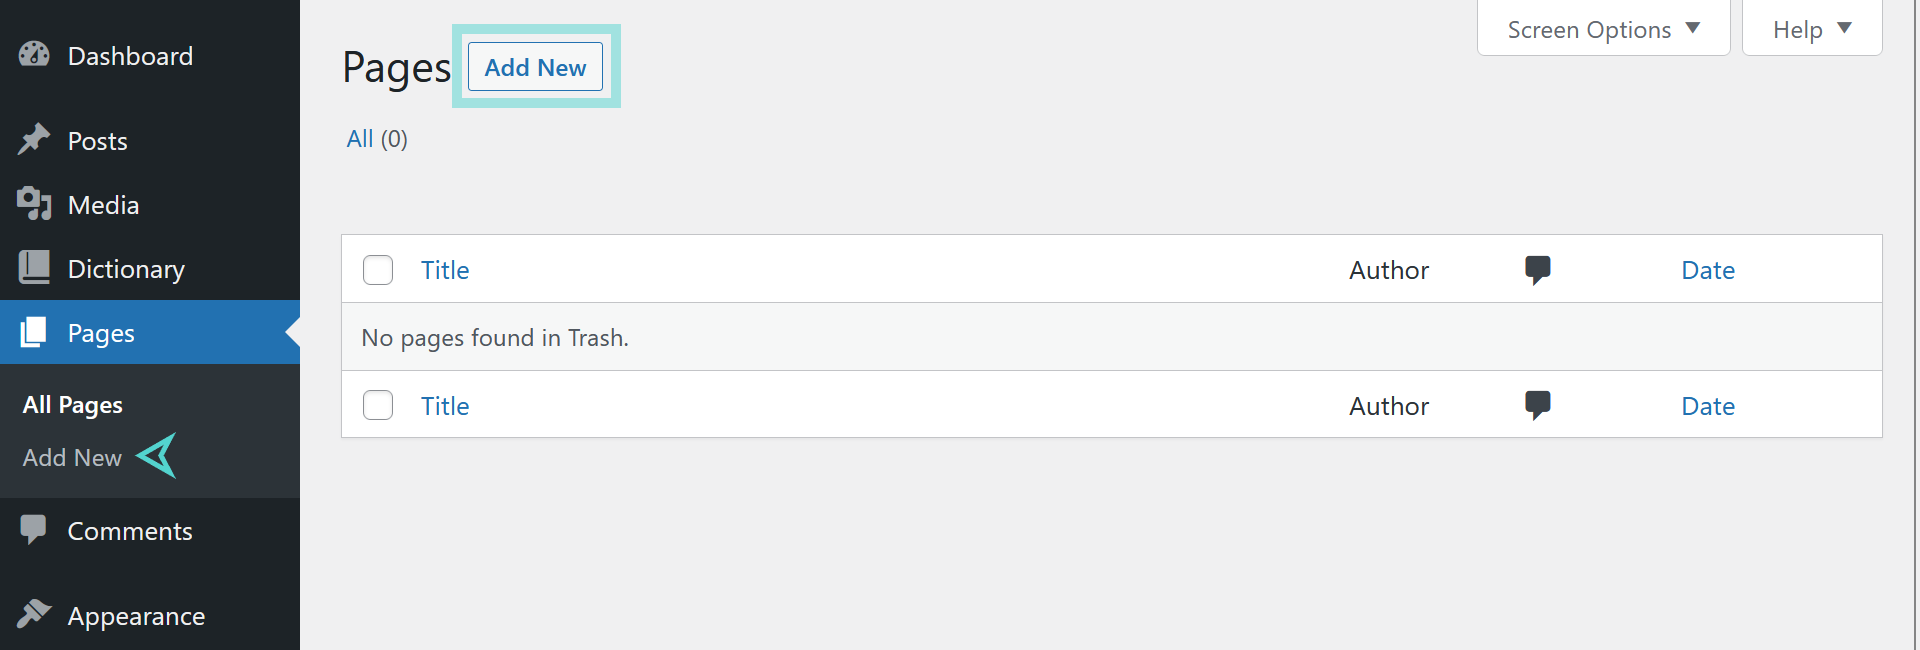
Step 1: Publish a “Home” page
If you already have a new page created that you wish to use as your homepage, skip this section and move to Step 2.
- Go to Pages in WordPress Dashboard.
- Click on Add New Page.
- Give the page a title like ‘Home’, or whatever you would like it to be called.
- Publish the new page.

Step 2: Set a Static Front Page
You can set a new static page as your site’s home page using one of the methods described below.
To set a static home page, your site must have at least one published page. Go back to Step 1 if you don’t see it!
- Go to Appearance → Customize.
- Select Homepage → Homepage Settings.
- Select A static page.
- From the drop-down menu under Homepage, choose your new page as the front page for your site.
- Click Save Changes.

Step 3: Create a Blog Page
To set a posts page from the Customizer:
- Go to Appearance → Customize.
- Select Homepage → Homepage Settings.
- From the “Posts page” dropdown, select the new page you would like to display your posts.
- Click Save Changes.

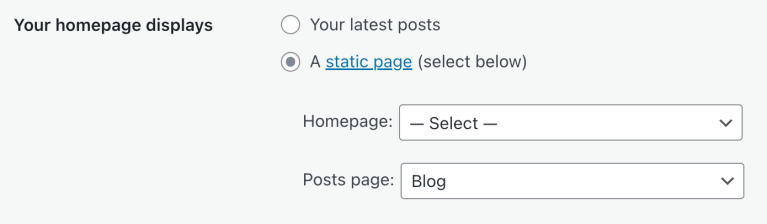
Set a Homepage via Settings
To set your homepage from Settings:
- Go to Settings → Reading in the left sidebar of your site WordPress Dashboard.
- Next to the label Your homepage displays, select the radio button A static page.
- From the drop-down menu next to “Homepage,” choose your new page as the front page for your site.
- Click Save Changes at the bottom of the page.

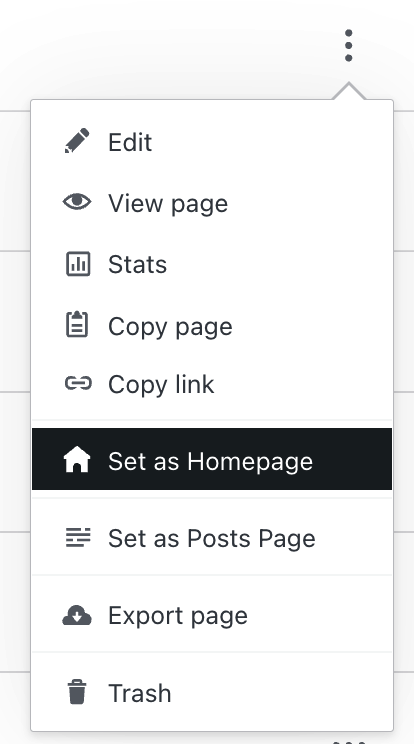
Set a Homepage via the Pages Screen
If your theme has already been set to use a static page as the home page, you can open your list of pages and click on the three dots next to a page, then select Set as Homepage.
Set a Posts Page via Settings
To set your homepage from Settings:
- Go to Settings → Reading in the left sidebar of your site WordPress Dashboard.
- Next to the label Your homepage displays, select the radio button A static page.
- From the drop-down menu next to Posts page, choose your new page you would like to display as the posts page for your site.
- Click Save Changes at the bottom of the page.
Set a Posts Page via the Pages Screen
If your theme has already been set to use a static page as the home page, you can open your list of pages and click on the three dots next to a page, then select Set as Posts Page.

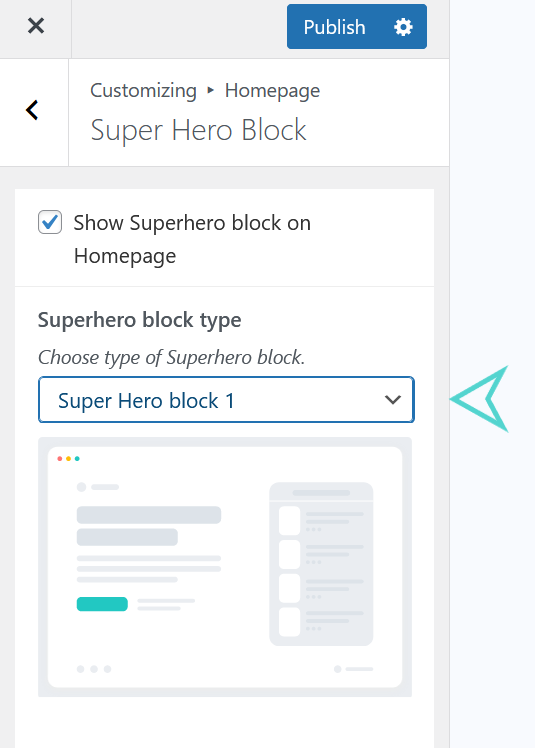
Set a Super Hero Block
To set up Super Hero Block navigate to Appearance > Customize > Homepage > Super Hero Block.

As option you can Show/Hide Super Hero Block. Use Show Super Hero Block checkbox for that.
There are 4 types or layouts of Super Hero Blocks:
- Super Hero Block with Right Sidebar
- Super Hero Block with Video Link
- Super Hero Block with Slider (Menu navigation at top)
- Super Hero Block with Slider (Menu navigation on the left side)
Location: Appearance > Customize > Homepage > Super Hero Block.
Super Hero Block with Right Sidebar
You can set or change Super Hero Block with Right Sidebar in order to do that follow the next steps:
- Navigate to Appearance > Customize > Homepage > Super Hero Block.
- Choose Super Hero Block 1.
Customize Setting:
Right Sidebar View:

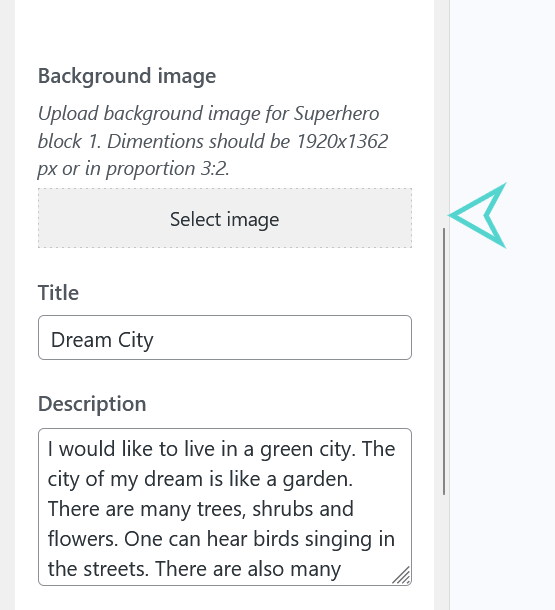
– Background Image
To set up a Background Image of Super Hero Block 1 (with Right Sidebar):
- Navigate to Appearance > Customize > Homepage > Super Hero Block.
- Choose Super Hero Block 1.
- Select an Image from Media Library or upload a new one.
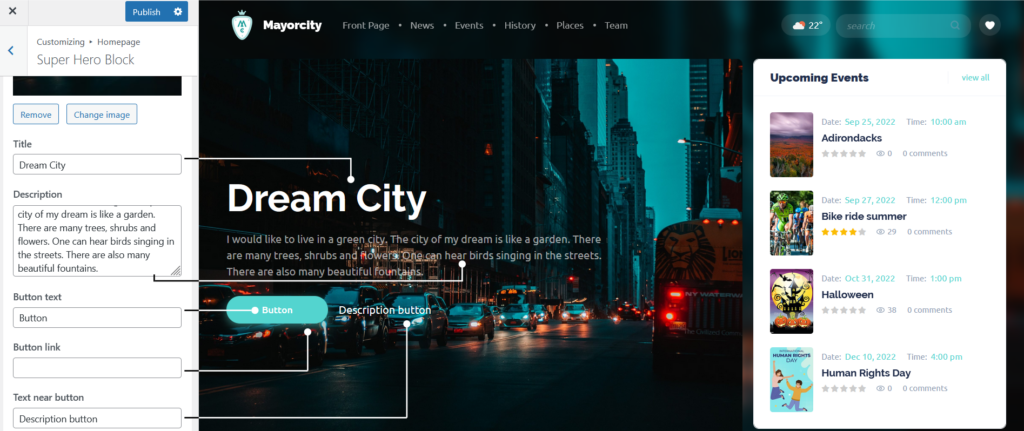
You can set the following overlays on background image of Super Hero Block:
- Change or set Title for image overlay
- Location: Appearance > Customize > Homepage > Super Hero Block->Title
- Change or set Description for image overlay
- Location: Appearance > Customize > Homepage > Super Hero Block->Description
- Change or set Button text
- Location: Appearance > Customize > Homepage > Super Hero Block->Button text
- Change or set Button Link for this button
- Location: Appearance > Customize > Homepage > Super Hero Block->Button link
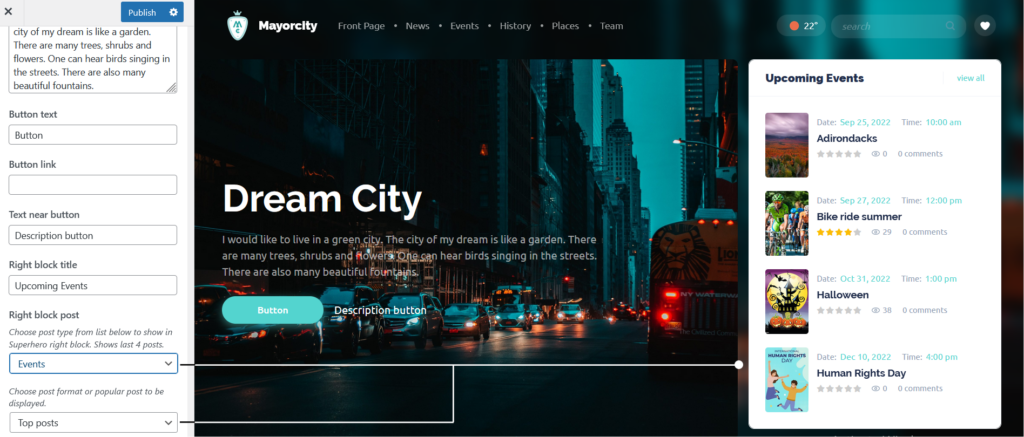
– Right Sidebar
To set up Right Block Sidebar in Super Hero Block 1, choose post to be displayed in it.
Location: Appearance > Customize > Homepage > Super Hero Block->Right Block Post
You can show the following posts in Right Sidebar. Each post has it is own settings to be displayed in right sidebar.
- Posts with following additional settings:
- change or set top posts
- change or set latest posts
- change or set top video posts
- change or set latest video posts
- Events (Default) with following additional settings:
- change or set top posts
- change or set latest posts
- change or set upcoming events
- Places with following additional settings:
- change or set top posts
- change or set latest posts
- History with following additional settings:
- change or set top posts
- change or set latest posts
- Team with following additional settings:
- change or set top posts
- change or set latest posts
Choose post format or popular post to be displayed as shown in following image illustration.
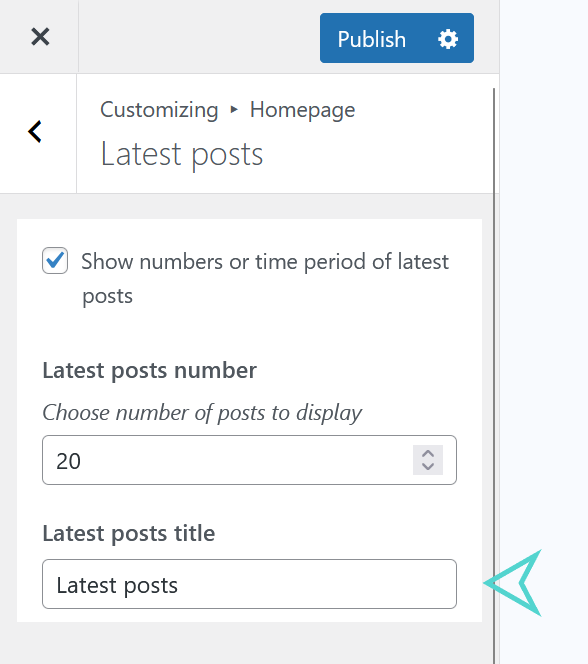
Latest posts section
To set up or change the setings of Latest posts section navigate to Appearance > Customize > Homepage > Latest Posts. Here you can choose number of latest post or time period in days to display posts within latest post section in homepage.
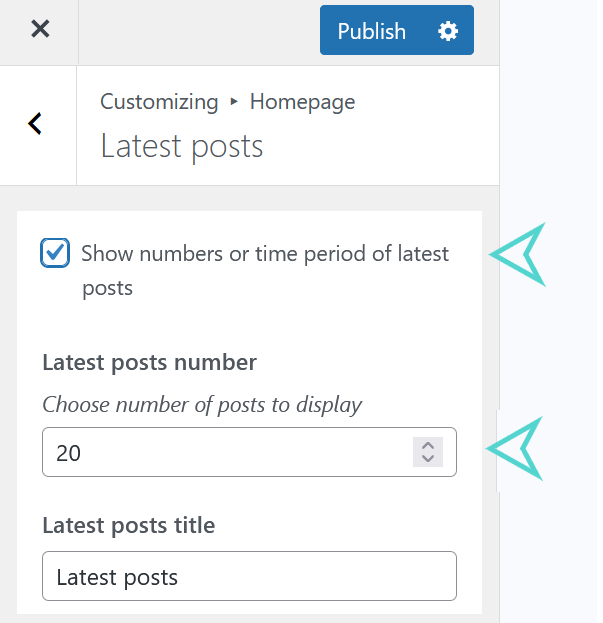
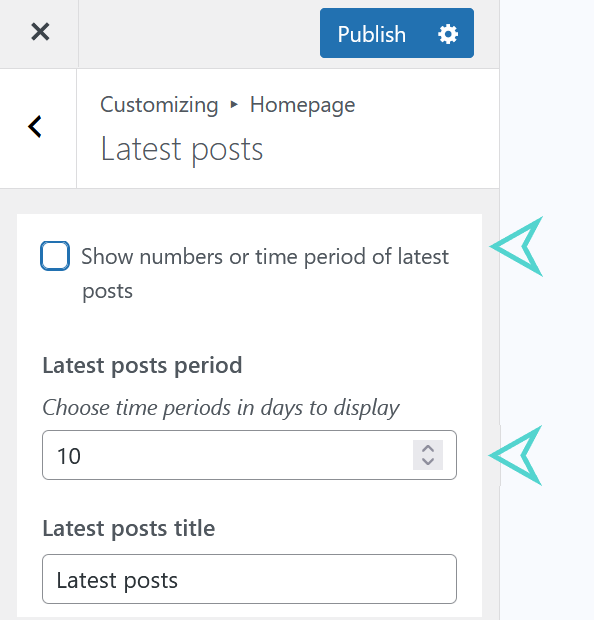
– Latest posts title
You can change your latest post title to be displayed as block title within latest post section in homepage.
– Top posts
You can choose one of your post as main post or you can show latest post as main post. As default, it shows the latest post as main post of your latest post section in homepage. You can choose main post by unchecking Always show last post as main post checkbox and pin your main post to be displayed in homepage latest post section.
- Latest post as main

- Uncheck Always show last post as main post and pin main post from list

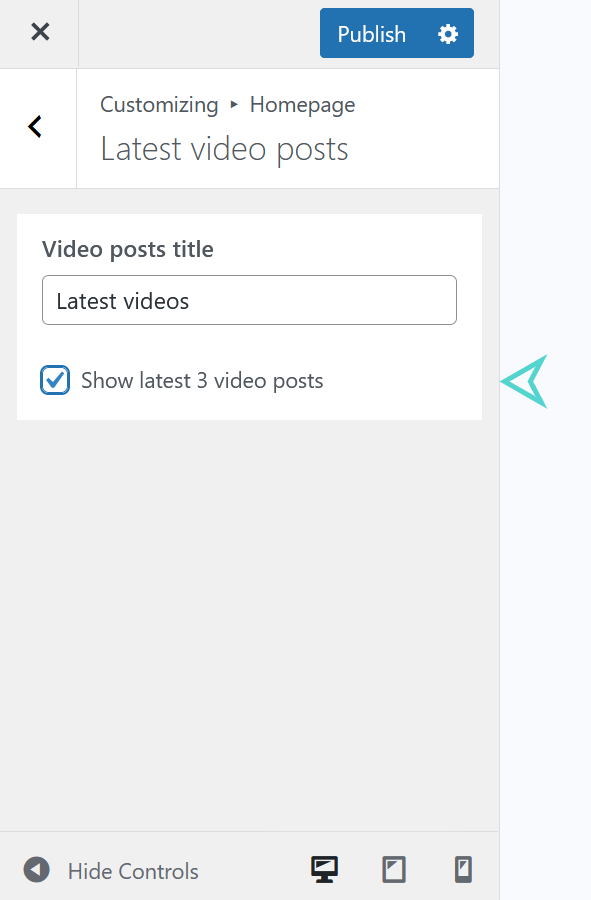
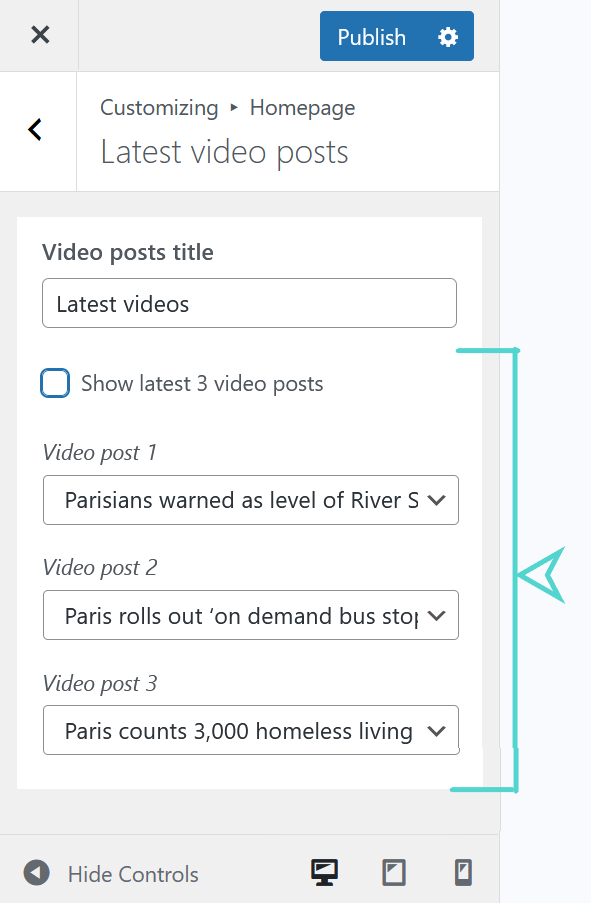
Latest video posts section
To set up or change settings of a Latest video posts section navigate to Appearance > Customize > Homepage > Latest Video Posts. Here you can change the title of video post section and choose latest 3 videos or show latest 3 video post in this section.
– Latest video posts title
You can change your latest video posts title to be displayed as block title within latest video section in homepage.

– Latest video posts
You can choose three of your video posts to be displayed in latest video section of homepage. As default, it shows the latest 3 video posts. You can choose 3 video posts by unchecking Show latest 3 video posts checkbox and choose 3 video posts to be displayed in homepage latest video posts section.
Latest 3 videos to be displayed
Choose 3 videos to be displayed
Places section
To set up or change settings of a Places section navigate to Appearance > Customize > Homepage > Places. Here you can change the title of places section located in homepage.
– Places section title
You can change your places section title to be displayed as block title in homepage.

Color settings
To get started, go to Appearance → Customize → Colors. The MayorCity theme supports the following color settings:
- Background color
- Change the background color of the site.
- Accent color
- Change the primary theme color or accent color of the site.
- Title color
- Change the color of post titles of the site.
Location: Appearance > Customize > Colors
Background color
MayorCity theme allows you to change the background color of your site. You can achieve the uniform theme color for your site using this section. It is for setting the default color that applies throughout your whole site.
Location: Appearance > Customize > Colors > Background color.
After clicking Background color button, you can choose color from the color palette, or you can click color to choose your own color.
As well, you can return to default color by clicking button clear or default.

Accent color
MayorCity theme allows you to change the basic color of your site. You can achieve the uniform theme color for your site using this section. It is for setting the default color that applies throughout your whole site.
Location: Appearance > Customize > Colors > Accent color.
After clicking Acccent color button, you can choose color from the color palette, or you can click color to choose your own color.
As well, you can return to default color by clicking button clear or defaul

Events section
To set up or change settings of a Events section navigate to Appearance > Customize > Homepage > Events Here you can change the title of events section located in homepage.
– Events section title
You can change your events section title to be displayed as block title in homepage.

Title color
MayorCity theme allows you to change the color of post’s title of your site. It is for setting the default color that applies throughout your whole site.
Location: Appearance > Customize > Colors > Title color.
After clicking Title color button, you can choose color from the color palette, or you can click color to choose your own color.
As well, you can return to default color by clicking button clear or default.

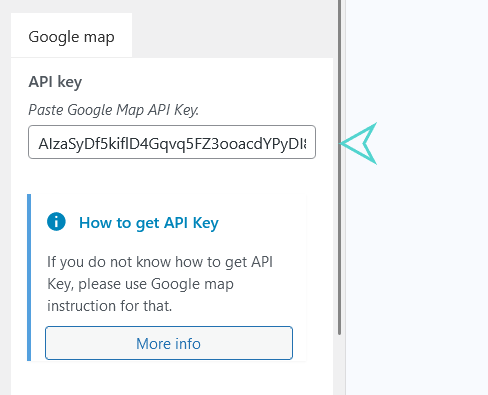
Google Map
MayorCity theme has integrated Google Map which must be activated by getting Google Map API Key, see instruction located in the following location:
Location: Appearance → Customize → Google Map
There are links and instruction how to get your Google Map API Key, as well some map settings like zoom, coordinates to indicate the location of your city.
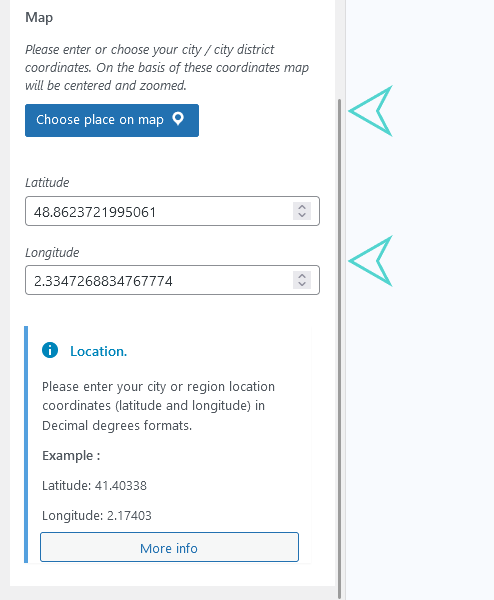
After getting Google Map API Key paste it input shown in the right-side picture and save it. Once you have connected you should choose place on the map or show location by indicating coordinates (latitude and longitude) of your city location. See next picture illustration for that.
Here as shown on the right-side picture you can choose the location of your city by clicking the button Choose place on map.
Alternatively, you can choose the location of your city manually by indicating coordinates (pasting latitude and longitude of your city in the inputs named correspondingly).
There are two types of built-in map in MayorCity Theme:
- Main Map (Big Map) – which is displayed on Front Page and Place Posts Page
- Small Map of single page – which is displayed on contact page, form pages, events post single pages and places posts single pages.
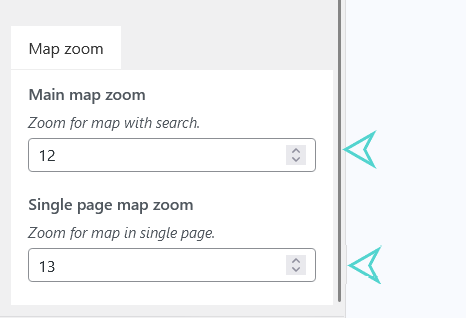
You can change the zoom settings of Google map by indicating number of zoom as shown on the right-side picture.
Create API keys
The API key is a unique identifier that authenticates requests associated with your project for usage and billing purposes. You must have at least one API key associated with your project.
To create an API key use this instructions: Create API KEY.
Enable Maps JavaScript API
Before you start using the Maps JavaScript API, you need a project with a billing account and the Maps JavaScript API enabled. To learn more, see Set up in Cloud Console.
If the Maps JavaScript API is not listed, you need to enable it. See instructions Enable Maps Javascript API.
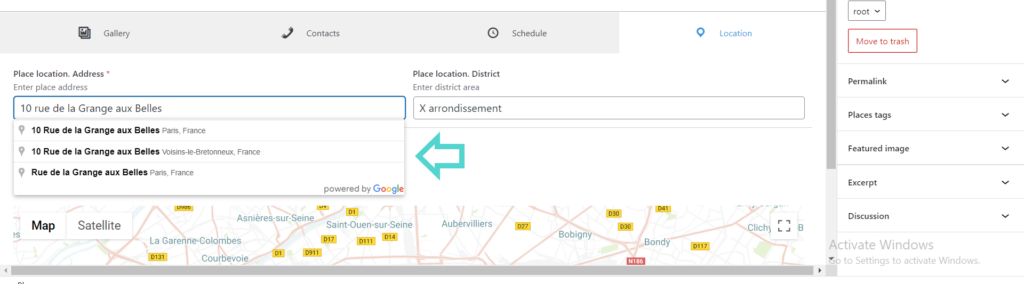
Enable Places Library to activate autocomplete feature on Google Map
Autocomplete is a feature of the Places library in the Maps JavaScript API. You can use autocomplete to give your applications the type-ahead-search behavior of the Google Maps search field. The autocomplete service can match on full words and substrings, resolving place names, addresses, and plus codes. Applications can therefore send queries as the user types, to provide on-the-fly place predictions.
Before using the Places library in the Maps JavaScript API, first ensure that the Places API is enabled in the Google Cloud Console, in the same project you set up for the Maps JavaScript API.
To view your list of enabled APIs:
- Go to the Google Cloud Console.
- Click the Select a project button, then select the same project you set up for the Maps JavaScript API and click Open.
- From the list of APIs on the Dashboard, look for Places API.
- If you see the API in the list, you’re all set. If the API is not listed, enable it:
- At the top of the page, select ENABLE API to display the Library tab. Alternatively, from the left side menu, select Library.
- Search for Places API, then select it from the results list.
- Select ENABLE. When the process finishes, Places API appears in the list of APIs on the Dashboard.
For more instruction see Enable Places Library.
Enabling Places Library will activate autocomplete of places coordinates on admin and front end section as well. Below you can see illustration where it will be effected:
On Events posts (admin area):

On Events form (front-end area):

On Places posts (admin area):
On Places form (front-end area ):

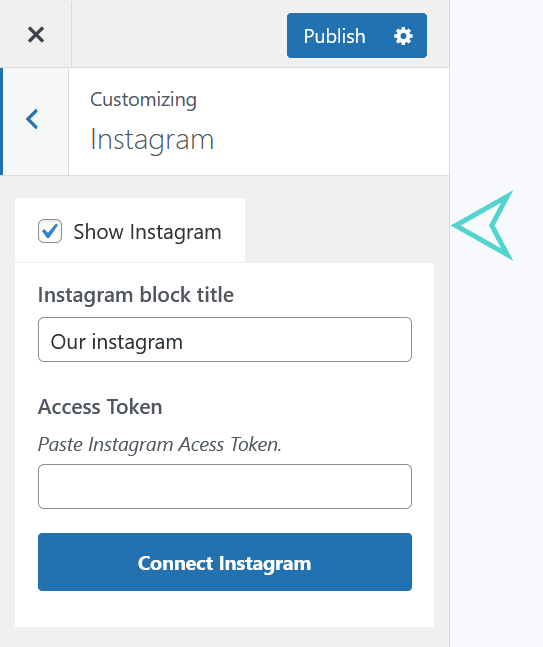
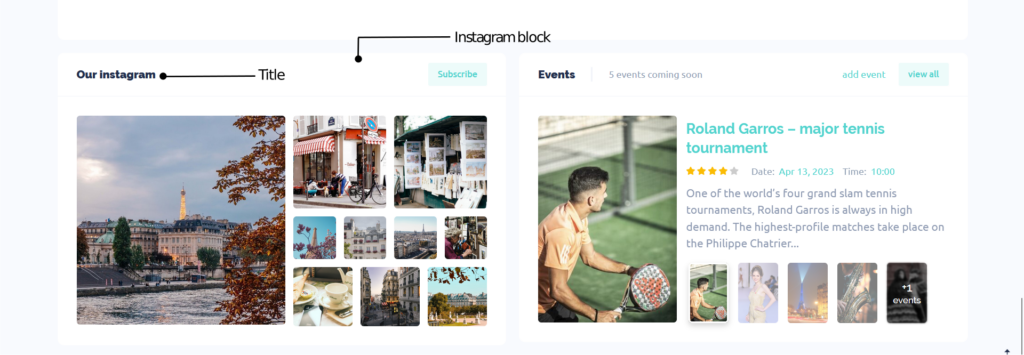
Instagram account Integration
To set up or change the settings of Instagram navigate to location setting:
Location: Appearance > Customize > Instagram.
To add your Instagram account to website, check Show Sidebar checkbox.
Using Instagram block title , you can change title of the block where Instagram images appear.
Next step is to get Access Token, paste it in Access Token input and press Connect Instagram button.
Access tokens are valid for 60 days. If the widget stops working, please get a new Access Token.
Using the access token, you will be prompted to authorize the theme to access your Instagram photos. The theme widget will automatically display the latest photos of the account which was authorized on this page.
Blog Post Header
To set up or change the settings of Blog post Header navigate to location setting:
Location: Appearance > Customize > Blog Post > Header.
Here you can change or set title of blog posts header and describe the purpose of the page.
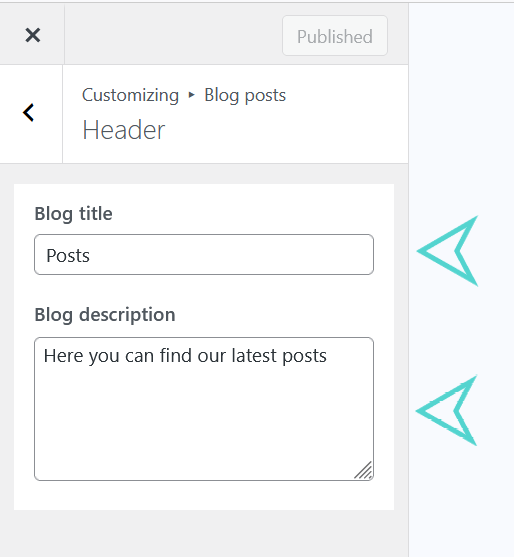
To change or set title of the page use Blog title input.
To write the archive page description use Blog description input.

Blog Layout
There are two types of blog layouts in MayorCity theme:
- Sticky blog (Sticky Layout)
- Carousel Blog (Carousel Layout)

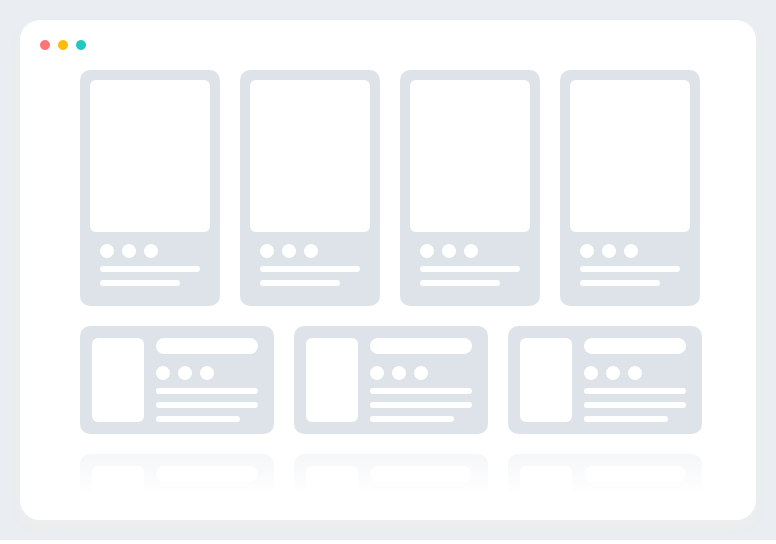
To set up or change the settings of Blog Layout navigate to location setting:
Location: Appearance > Customize > Blog Post > Layout.
In Customize in the selection area Post Blog Layout, select one of the Layout of Blog posts.

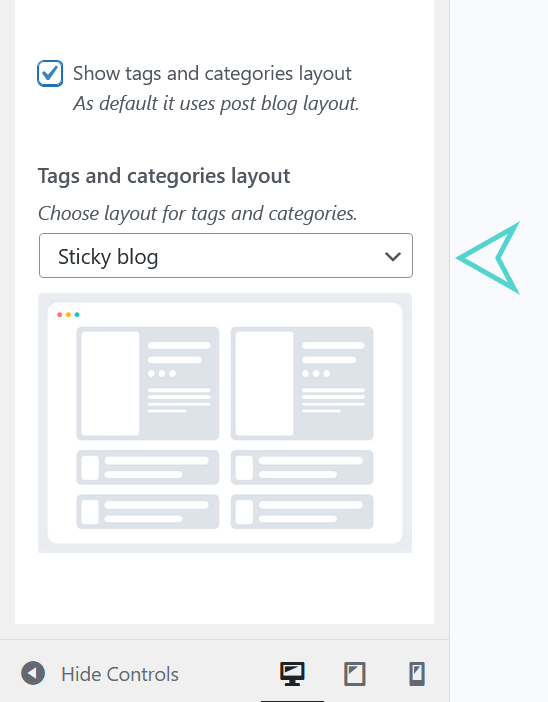
Tags and categories Layout
To set up or change the settings of Blog Layout navigate to location setting:
Location: Appearance > Customize > Blog Post > Layout > Tags and Categories layout.
Here you can choose different layout for Tags and Categories pages. In order to do that check Show tags and categories layout checkbox and layout for them will be appeared. If this checkbox is unchecked then blog layout will be used for tags and categories as well.
You can us for tags and categories the same blog layouts:
- Sticky blog layout
- Carousel blog layout
Blog Post Sidebar
You can change the layout of blog post by adding Left or Right Sidebar. To set up or add Sidebar to Blog post page navigate to location setting:
Location: Appearance > Customize > Blog Post > Sidebar.
To add Sidebar check Show Sidebar checkbox.
To change position of the Sidebar select Left or Right position in selection area.

Places Archive Page Header
To set up or change the settings of Events Archive Page Header navigate to location setting:
Location: Appearance > Customize > Places.
Here you can change or set title of places archive page header and describe the purpose of the page.
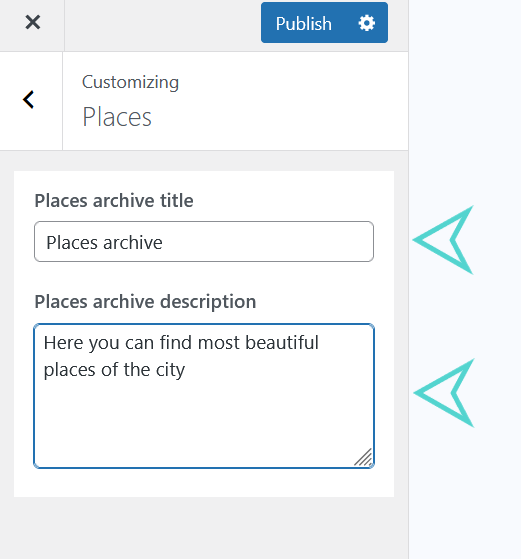
To change or set title of the page use Places archive title input.
To write the archive page description use Places archive description input.

Video Posts Header
To set up or change the settings of Video posts Header navigate to location setting:
Location: Appearance > Customize > Video Posts > Header.
Here you can change or set title of video posts header and describe the purpose of the page.
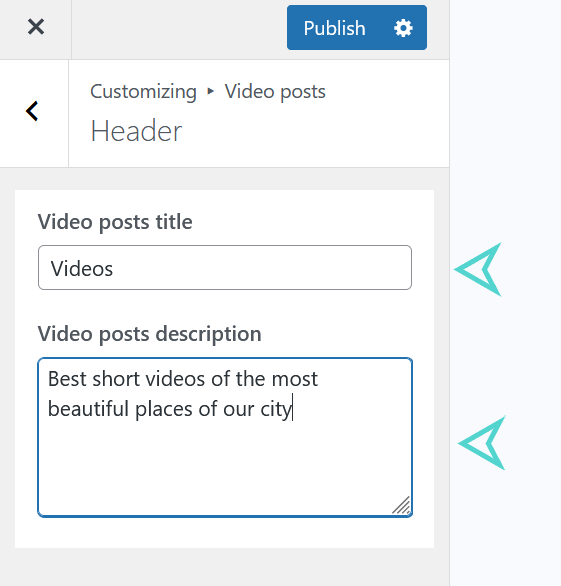
To change or set title of the page use Video title input.
To write the archive page description use Video description input.
Video Layout
There are two types of blog layouts in MayorCity theme:
- Sticky video blog (Sticky Layout)
- Carousel video Blog (Carousel Layout)
To set up or change the settings of Video Layout navigate to location setting:
Location: Appearance > Customize > Video posts > Layouts.
In Customize in the selection area Video posts layout, select one of the Layout of Blog posts.

Video Posts Sidebar
You can change the layout of video posts by adding Left or Right Sidebar. To set up or add Sidebar to Video post page navigate to location setting:
Location: Appearance > Customize > Video Posts > Sidebar.
To add Sidebar check Show Sidebar checkbox.
To change position of the Sidebar select Left or Right position in selection area.

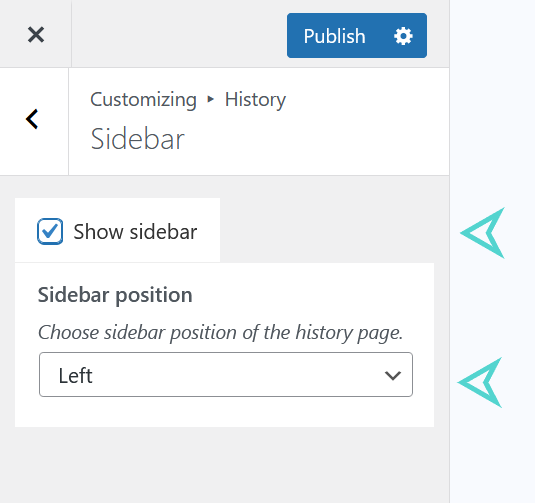
History Posts Header
To set up or change the settings of History Header navigate to location setting:
Location: Appearance > Customize > History > Header.
Here you can change or set title of History header and describe the purpose of the page. To change or set title of the page use History title input.
History Posts Sidebar
You can change the layout of history posts by adding Left or Right Sidebar. To set up or add Sidebar to History post page navigate to location setting:
Location: Appearance > Customize > History Posts > Sidebar.
To add Sidebar check Show Sidebar checkbox.
To change position of the Sidebar select Left or Right position in selection area.
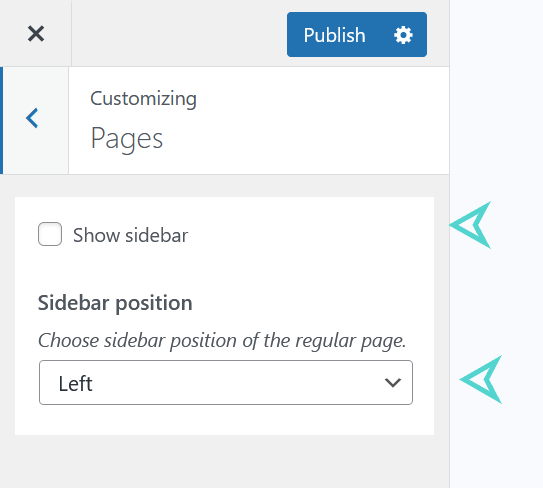
Page Sidebar
You can change the layout of page single page by adding Left or Right Sidebar. To set up or add Sidebar to Page single page navigate to location setting:
Location: Appearance > Customize > Page > Sidebar.
To add Sidebar check Show Sidebar checkbox.
To change position of the Sidebar select Left or Right position in selection area.
Social Media Links
To set up Social Media Icons navigate to Appearance > Customize > Social Media > Social Links, first select the icon, then enter your social media URL. These icons will appear in the Super Hero Block and Footer area.

Social Share Buttons
To set up Social Share Buttons navigate to setting location:
Location: Appearance > Customize > Social Media > Social Share Buttons
Choose social media buttons to be displayed in single page. By dragging the list you can change display order.

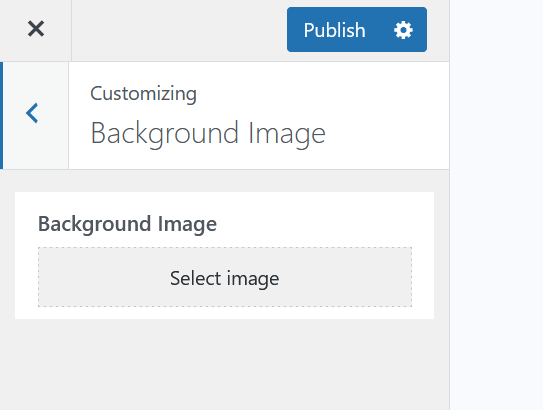
Background Image
To set up a Background Image for website body navigate to customize setting location:
Location: Appearance > Customize > Background Image.
Select an Image from Media Library or upload a new one.
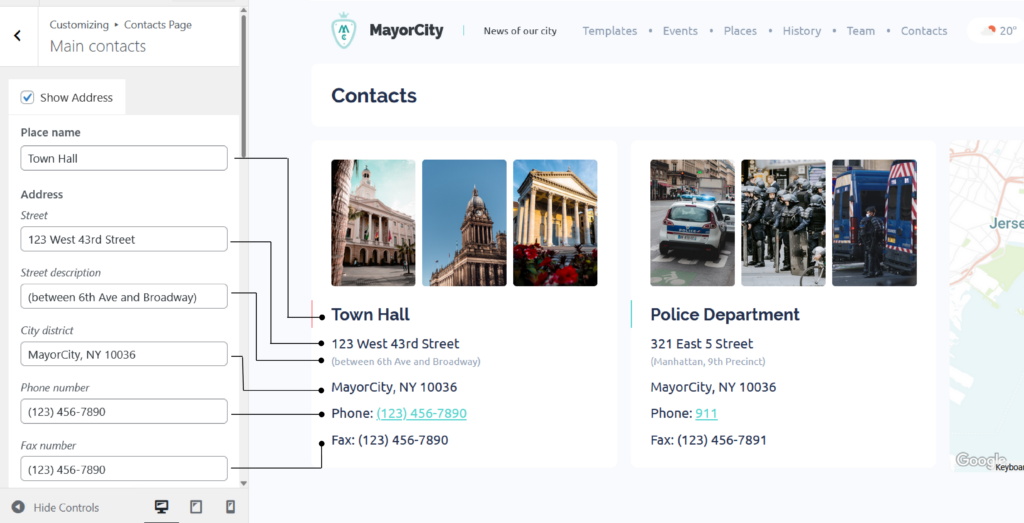
Main contacts
To set up main contact information navigate to location of settings:
Location: Appearance->Customize->Forms->Contacts Page->Main contacts.
Instructions how to fill information fields are shown on below image. As well you can enable or disable main contact information by checking and unchecking Show Address checkbox.
Search Page Title
To change title in Search page navigate to title setting location:
Location: Appearance > Customize >Search > Search page title
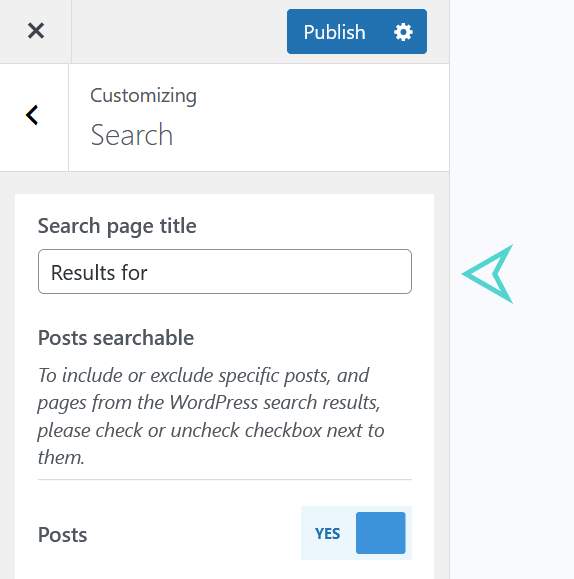
After changing title of search page in customize, you will get:

Enable or Disable Search Posts
You can include or exclude specific posts, and pages from the WordPress search results, please check or uncheck checkbox next to them.

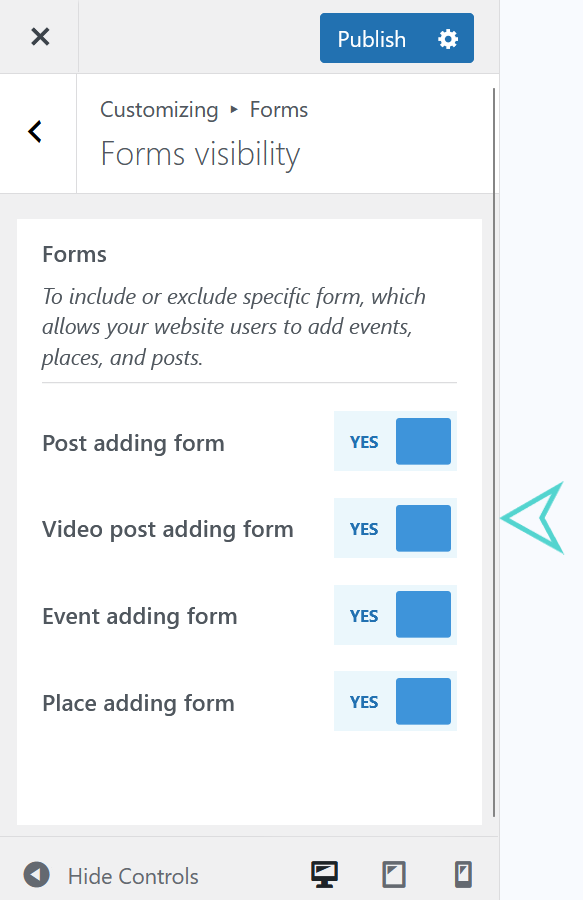
Enabling and Disabling Forms
There are four types of forms which allow users to write and submit posts for approval of administrator to be displayed in your website.
- Post adding form
- Video post adding form
- Event adding form
- Place adding form
To enable or disable specific form, which allows your website users to add events, places, and posts go to the following customize location:
Appearance->Customize->Forms->Forms visibility
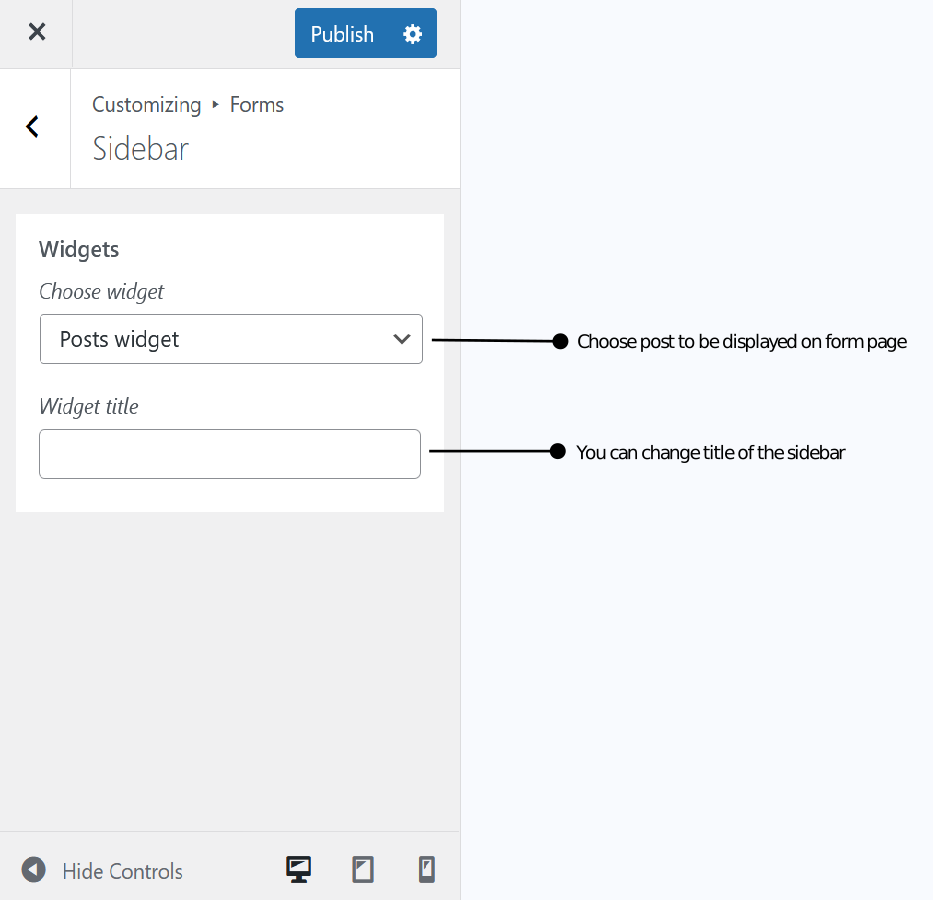
Form page sidebar widget
You can add sidebar with various posts using widgets of MayorCity theme on forms page. To set sidebar go to fooling location of settings:
Location: Appearance->Customize->Forms->Sidebar
Terms and Policies
You can change text and link to the pages of Terms and Policies of your company or website using shortcode.
