Installation
WordPress Information
To install the theme, you need to have a working version of WordPress installed. Below are some useful links where you can find information about WordPress:
- Basic information about WordPress.
- WordPres lessons – Knowledge base for novice WordPress users.
- PHP functions – This page contains detailed information about WordPress PHP functions and numerous examples of their use.
- Site Editor tutorials
Theme Requirements
The theme requires WordPress version 6.0 or higher, as well as PHP version 7.4 or higher. For third-party plugins, additional requirements may apply. For example, WooCommerce may require PHP 7.4 or higher, and so on.
Block themes can be resource-intensive and may require adequate server resources to ensure optimal performance. It is recommended to contact your hosting service provider to ensure that the PHP configuration on your server meets the following requirements:
max_execution_time 600memory_limit 128Mpost_max_size 32Mupload_max_filesize 32M
If you are using a hosting service with limited resources, you may encounter issues when installing demo data.
Theme Installation
There are two methods available for installing the theme
WordPress admin panel
- Please log in to the WordPress administrator panel.
- Navigate to Appearance > Themes and click on Add New, then proceed to upload the theme.

- Select the folder named herome.zip and click the Install Now button.
- After successful installation, press Activate or go to Appearance > Themes and click the Activate button to activate the newly installed theme.

FTP
- Access your web server using FTP client software.
- Unzip the herome.zip file and utilize ONLY the extracted /herome theme folder.
- Upload the extracted herome theme folder to /wp-content/themes directory.
- Navigate to the Appearance > Themes tab and activate the theme.
Plug-ins Installation
Below is a list of plugins included with the theme.
Some of these plugins can also be installed from the WordPress.org repository.
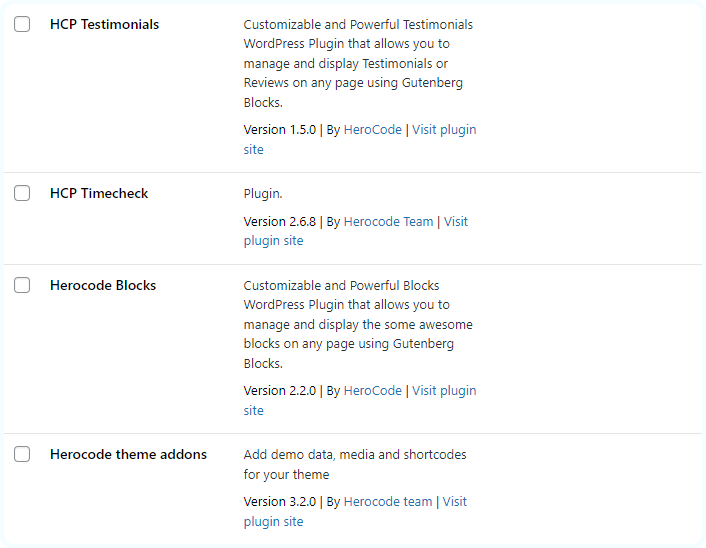
- HeroCode Theme Addons (mandatory)
- HeroCode Blocks
- HeroCode Testimonials
- HeroCode Timecheck
- Contact Form 7
- WooCommerce
- Yoast SEO
- MC4WP Mailchimp
- AddtoAny Share Buttons
In the Plug-ins section of this document, you can find a detailed description of the plugins created by the HerocCode team.
Required plugins
It is necessary to install the corresponding plugins to fully customize the theme’s appearance and functionality as on the demo page. After installing and activating the theme, you have to install and activate the following required plugins to have correctly working site:
- HeroCode Theme Addons
- HeroCode Blocks
- HeroCode Testimonials
- HeroCode Timecheck
The HeroCode Theme Addons plugin is the only plugin necessary for the theme to function properly. The remaining optional plugins are not mandatory for the theme. HeroCode Theme Addons will allow to install all required and recommended plugins.
Plugins’ customization
To install the recommended plugins, please navigate to the section Theme panel > Plugins.

Please indicate the plugins you would like to install or activate. Click Install & Activate. The installation may take a few minutes. Please be patient and refrain from refreshing the page.
If you are using hosting with limited resources, it is recommended to install plugins one by one. You may need to install only the essential plugins, such as HeroCode Theme Addons, and disable the rest. Otherwise, it can significantly increase memory usage, which may lead to issues of concern.
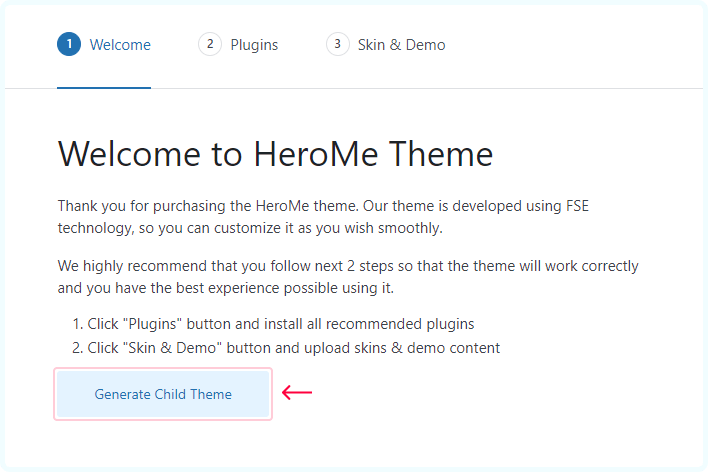
Child Theme
A child theme should be installed if you want to modify theme files and functions. This will ensure that your theme settings are preserved after updates.
A child theme can be installed from the tab Theme Panel > Theme activation. After clicking the Generate Child Theme button, the child theme will be automatically installed and activated.
Child theme functions
In the child theme, there is a separate functions.php file available. You can utilize this file to copy modified functions from the parent theme’s functions.php or register new functions.
By editing the style.css file in the child theme, you preserve the parent theme’s core functionality while changing the design and appearance of the website.
When copying files from the parent theme to the child theme, ensure to maintain the original folder structure. Create the corresponding folders and ensure that the file path is the same as in the parent theme.
Demo Content
Our theme provides a simple demo data installation feature. This allows your website to look exactly like the demo version of the theme.
Before installing the demo data, please make sure
- The theme is activated (Appearance > Theme)
- All recommended plugins are installed (Theme panel > Plugins)
- Ensure that your hosting meets the minimum requirements
- Have sufficient free space on your hosting (at least 100MB)
Our theme provides support for RTL (Right-to-Left) text direction (compatible without RTL demo content). Before installing the demo content, please ensure that you have selected the correct language in your WordPress settings (Dashboard > Settings > General > Site Language).
Demo content import
Go to Theme panel > Skin & Demo. First, determine the desired style of your website, which will include accent colors and suitable fonts for headings, main text, links, and buttons. If you are installing demo content, it will be unpacked according to the selected skin.
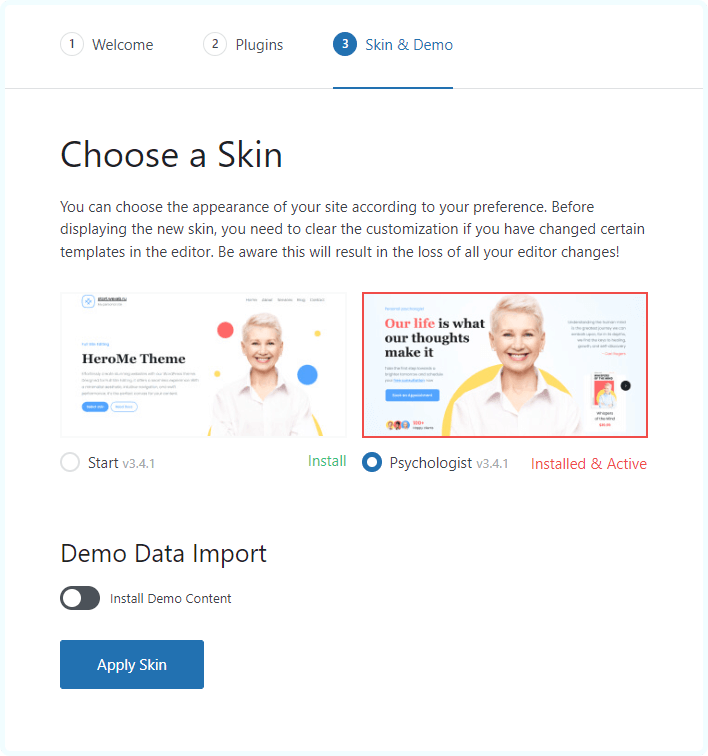
If you wish to obtain a complete copy of the demo website, you should enable the Install Demo Content feature and configure the relevant parameters. All media files, articles, categories, tags, products, theme settings, and plugin configurations can be imported with this tool.
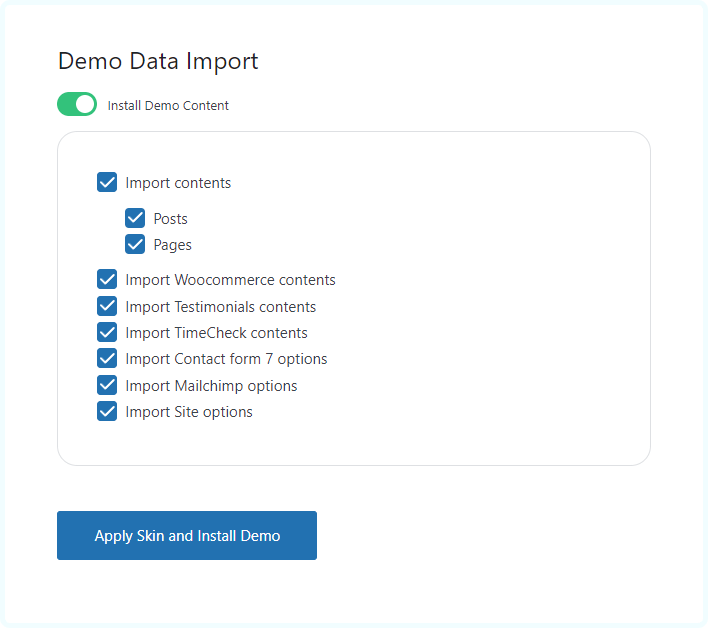
Single pages will be imported in a similar format to our demo version, but they will have blocks that need to be configured. You need to replace the categories/post IDs from the demo version with your own ones.
When unpacking the demo content, ALL OLD DATA WILL BE DELETED, and you will receive a new set of posts, pages, and menu items.
If the installation of the demo data is stuck and you see an “Oops! Something went wrong.” message, please contact your hosting service provider to ensure that your server configuration meets the theme’s requirements. Otherwise, please submit your request to our support department.
Alternative way to import demo content
If you have problem with installation of demo content in your site using Theme Panel, you can use alternative way to install it.
Important!
It is necessary to install all required plugins before importing demo content.
Step 1: In your website WordPress dashboard, go to Tools à Import and install built-in WordPress importer.
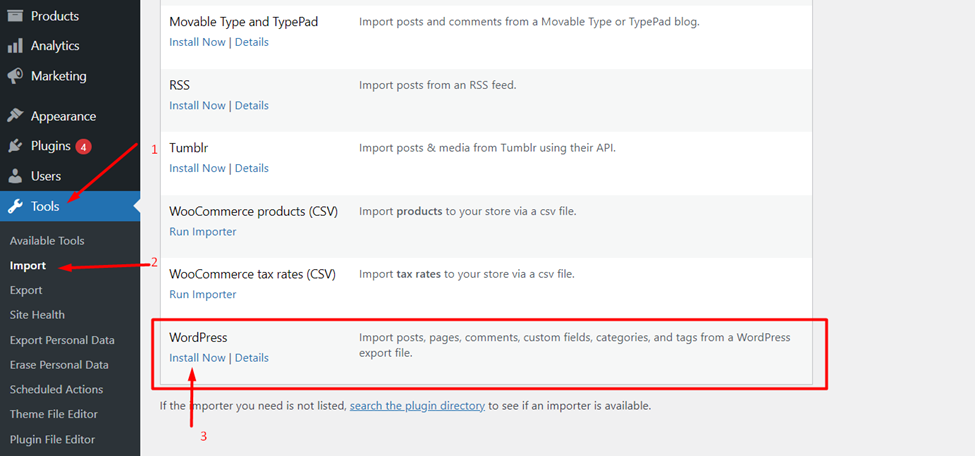
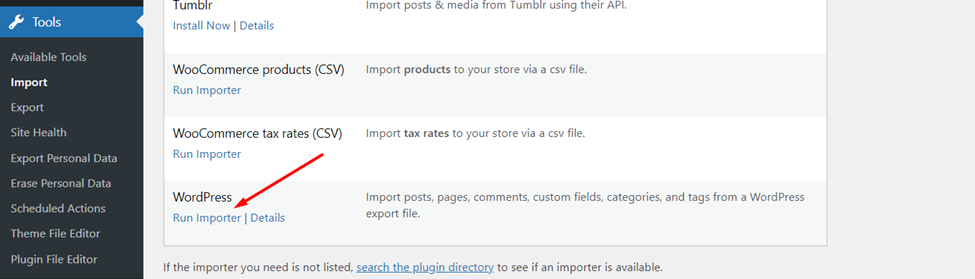
Step 2: After installation of WordPress Importer, click Run Importer.
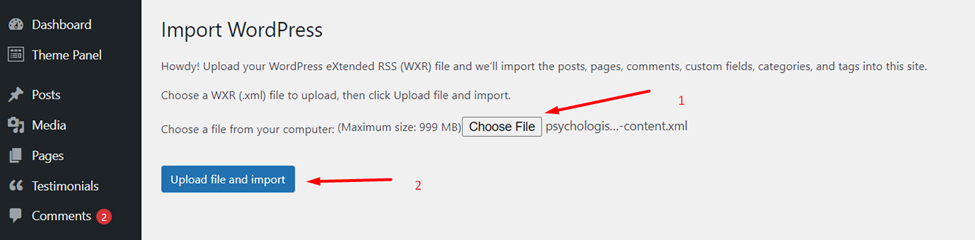
You will see Import WordPress page where you can choose file what to import. Choose file with .xml extension and click Upload file and import button. You have to unzip downloaded *.zip file and use .xml file for importing demo content.
Step 3: On the next page, check the checkbox Import Attachments (download and import file attachments) and click submit.
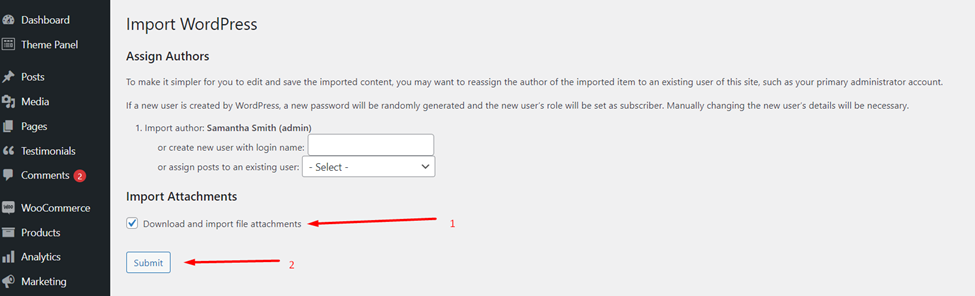
That’s it. After import is completed, you will see the message “All done. Have fun!”
Theme Update
We recommend performing the update if you have received a notification about a new version of the theme. To view the list of changes, please go to the relevant section.
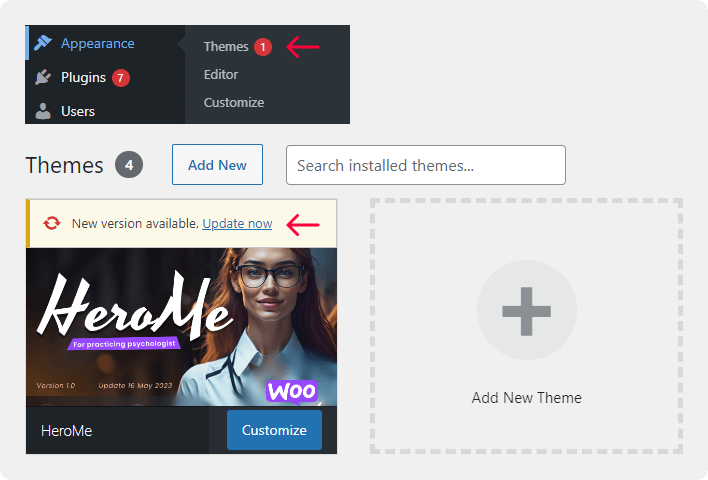
Before starting the update process, we recommend creating a backup of the folder containing your current theme. Please download and keep a copy of this backup on your local computer until you are confident that the new version of the theme is functioning correctly!
Go to Dashboard > Updates, In the Themes section, select the HeroMe theme. Click on “Update Themes” and wait for the theme to be updated.

To ensure the proper functioning of the theme, please update the plugins if you see a notification indicating a newer version is available.