Timecheck
3.15.2
Feb 01, 2024
Admin
- Bug fix: appointments were not deleted in the admin panel
- Changed the plugin description
Frontend
- Bug fix: calendar block styles had a conflict with system styles
3.6.7
Dec 3, 2023
Admin
- Improved fetch – added @wordpress/api-fetch
- Stylized the standart wp advert on the plugin pages
- Added a link to the documentation
- Some improvements to the Gutenberg block code
Frontend
- Improved fetch – added @wordpress/api-fetch
- Improved form validation
- Improved calendar user experience
- Changed enabling inline mode when the container is larger than 1200px
- Some code improvements and optimizations
- Calendar cell made flexible
- Added support for adaptive fonts
3.6.0
Oct 23, 2023
Admin
- Bug fix: changed empty email to customer
- Some code improvements and optimizations
- Added the new feature – inner max width for the calendar cols
- Prepared the plugin for placement on Envato
Frontend
- (content ::after) if border’s of parent is not exists will have new inset: values
- Remove @media (hover: hover) from css files
- Some apperance and code improvements
- Added phone field validation
3.5.4
Sep 9, 2023
- Update the translation file
Admin
- Bug fix: itnval changed to intval
- Bug fix: grammar errors
- Added a logic for returning the viewing of appointments for the current week
- Added a logic for returning the viewing of appointments for the current month
- Some code improvements
3.5.0
Aug 14, 2023
Admin
- Finished localization
Frontend
- Added the prefix ‘min’ to the front-end files (css,js)
- Comliled js files to es2020 standart
- Some code improvements – added comments to the code
3.4.3
Aug 4, 2023
- Update the translation file
Admin
- Bug fix: offday not show in frontend
- Improved gutenberg block styles and user experience
Frontend
- Some code improvements
3.3.17
Jul 19, 2023
Admin
- Bug fix: date selection on the daily chart – the request will be executed only if the date is valid
- Improved appointment user experience
- Some code improvements
- Added a new tab to display new appoitments
2.6.13
Jul 4, 2023
Admin
- The output of the selected date and time at the last step
- Improved language texts
- Added Gutenberg blocks description
Frontend
- The output of the selected date and time at the last step
- Improved the Gutenberg block user experience
- Enabled inline mode when the container is larger than 1208px. Previously it depended on the width of the browser window
2.6.9
Jun 29, 2023
Admin
- Bug fix: on install and on deactivate
- Bug fix: aligment the columns in the inline mode for the Gutenberg block
- Bug fix: added new text constants for translation
- Added default email texts
- Improved admin email sending
- Improved emails texts
- Some code improvements – added comments to the code
- Added appointments menu count
Frontend
- Improved language texts
2.5.1
Jun 7, 2023
Admin
- Bug fix: fixed correct suffixes for dates in the Gutenberg block
- Improved language constants
- Improved the Gutenberg block user experience
- Added multilanguage
Frontend
- Bug fix: fixed correct suffixes for dates
- Improved the Gutenberg block user experience
- Added multilanguage
2.4.7
Jun 1, 2023
Admin
- Some code improvements
- Removed canceled appointments from the output
Frontend
- Added placeholders to the appointment form
- Outputted the selected date
- Improved the output of the selected date and slot
2.4.0
May 28, 2023
Admin
- Admin email corrected
- Added a new calendar render after changing settings
- Added the otput of the Gutenberg block example
- Some code improvements
- Minor changes to the text
Frontend
- Improved texts
- The output of the selected date and time of the appointment is made
2.3.2
May 22, 2023
Admin
- Fixed several minor bugs
- Added default admin email address
- Some code improvements
- Expanded options for changing appointment time
2.1.14
May 20, 2023
Admin
- Bug fix: displaying appointment by 00:00
- Bug fix: check start time and end time, end time cannot be less than start time
- If the administrator select an already selected date in the custom schedule we will notify the administrator
Frontend
- Bug fix: empty slots will not be shown on off days
2.1.13
May 19, 2023
Admin
- Bug fix: calendar day offs
- Some code improvements
- Added mailer for appointments
2.1.7
May 17, 2023
Admin
- Bug fix: safari invalid date; new Date( ‘2023-05-18 09:00’ ) – invalid date, needs new Date( ‘2023-05-18’ )
- Bug fix: safari Y axis date is incorrect, fix added
2.1.3
May 17, 2023
Admin
- Added validation to time input fields
- Added the ability to manually edit appointment time
- Added handling of slot loading errors
2.1.2
May 16, 2023
Admin
- Added the button to add an appointment on the appointments page
- Show the popup error if there is an error in selecting the date or time in the custom shedule settings
Frontend
- Bug fix: css aligned the slots
- Improved the validation of the application and the display of the error text
2.0.0
May 2, 2023
- First release of completely rebuilt version 2
Timecheck step by step
Timecheck plugin collects client applications across all devices and displays them step-by-step.
1 step
This step requires the customer to choose a date for their appointment. To proceed, the customer must click the “Next” button once the date of the appointment has been decided.

2 step
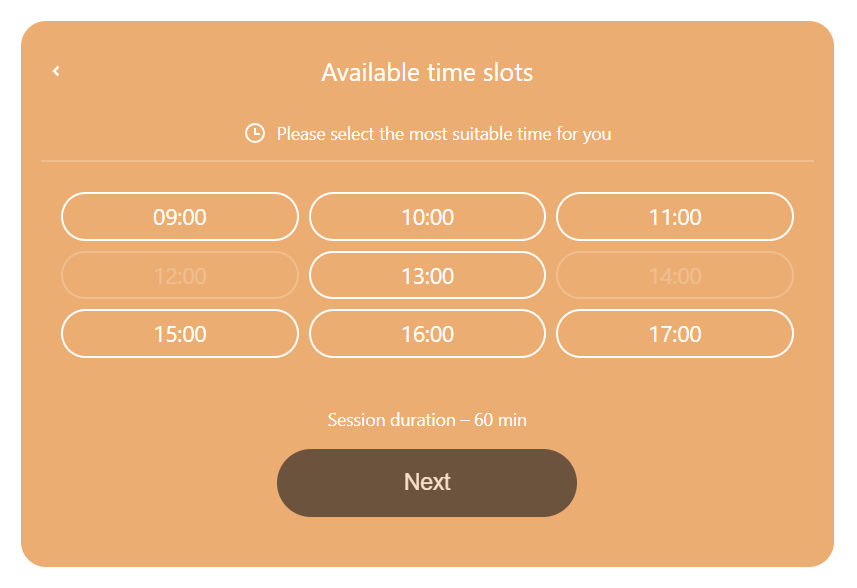
This step requires the customer to pick the appropriate time for his/her appointment. Upon choosing an appointment time, the customer can proceed by clicking “Next”.
3 step
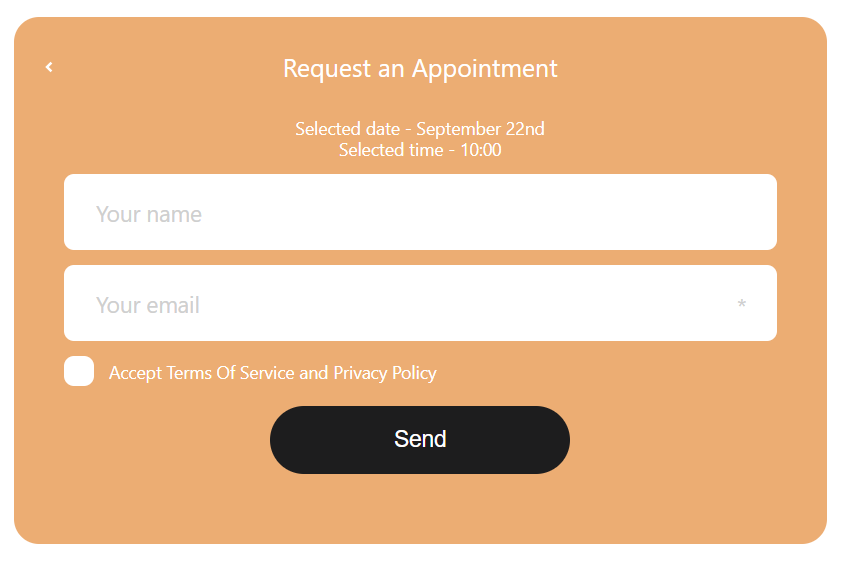
This step requires the customer to fill required form fields for his/her appointment. Once customer done with this step, he/she has to click “Send” button to submit the appointment details.
To add/edit form fields, navigate in WordPress Admin Panel Timecheck->Settings->Customazation Forms.
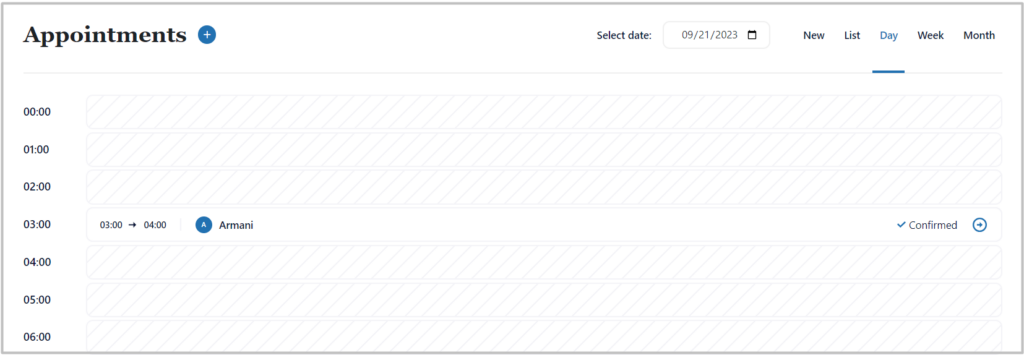
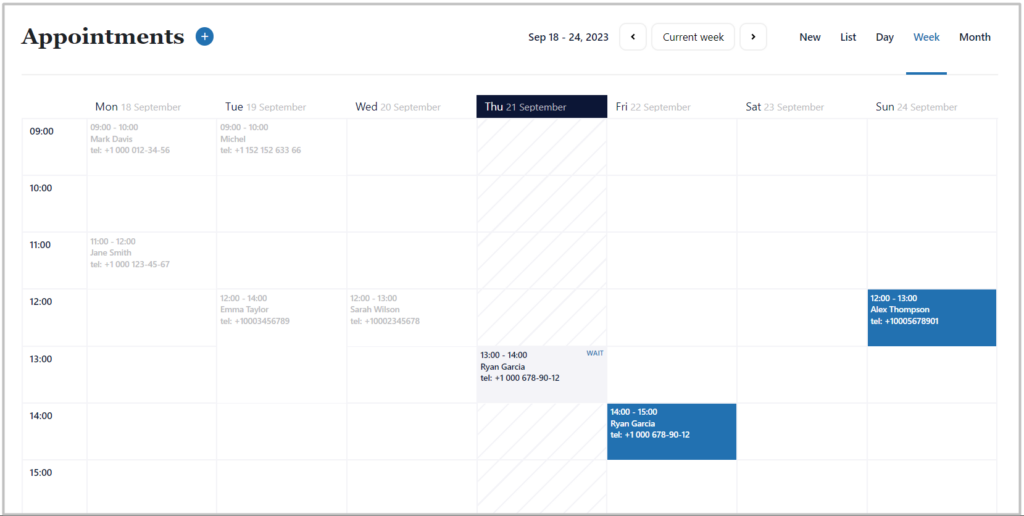
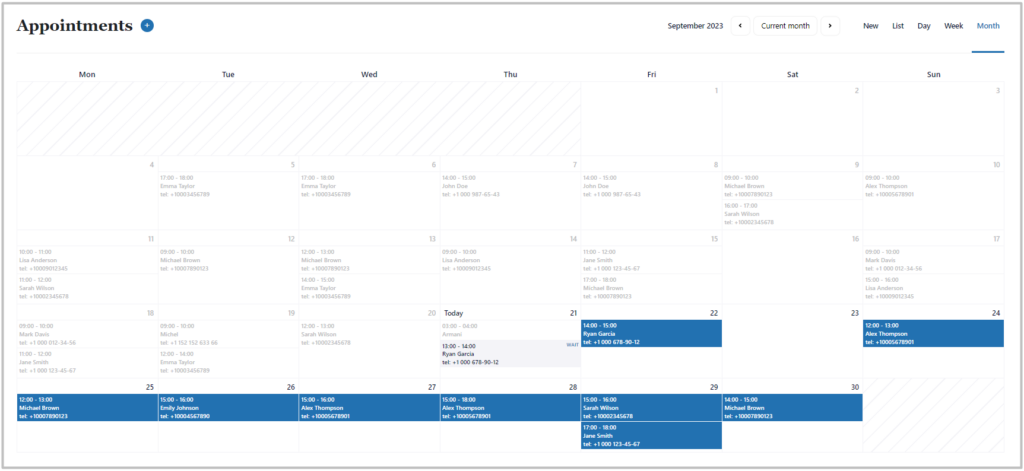
Calendar view
The Appointments page is a user-friendly scheduler, it shows all the scheduled appointments in a calendar view. There are three available types of calendar pre-views:
- Month
- Week
- Day
You can view the appointment details by clicking on the “appointments” within the appointment block in order to quickly view all the appointment details.
A blue color indicates that the appointment has been approved, a gray color indicates that the appointment is pending, and a gray color indicates that the appointment has been canceled.
Alternatively, you can edit an appointment from the calendar by clicking on the appointment.
Day view:
Week view:
Month view:
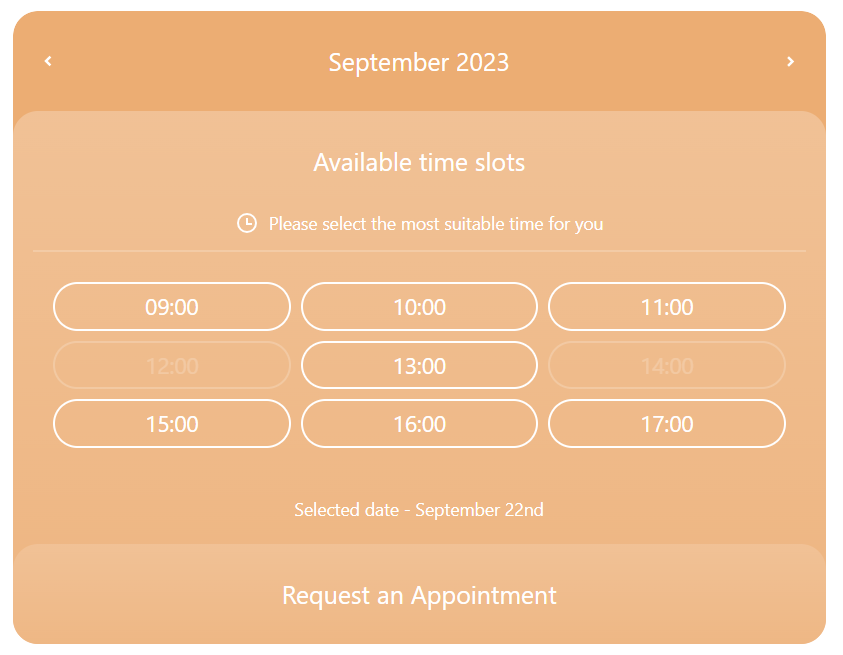
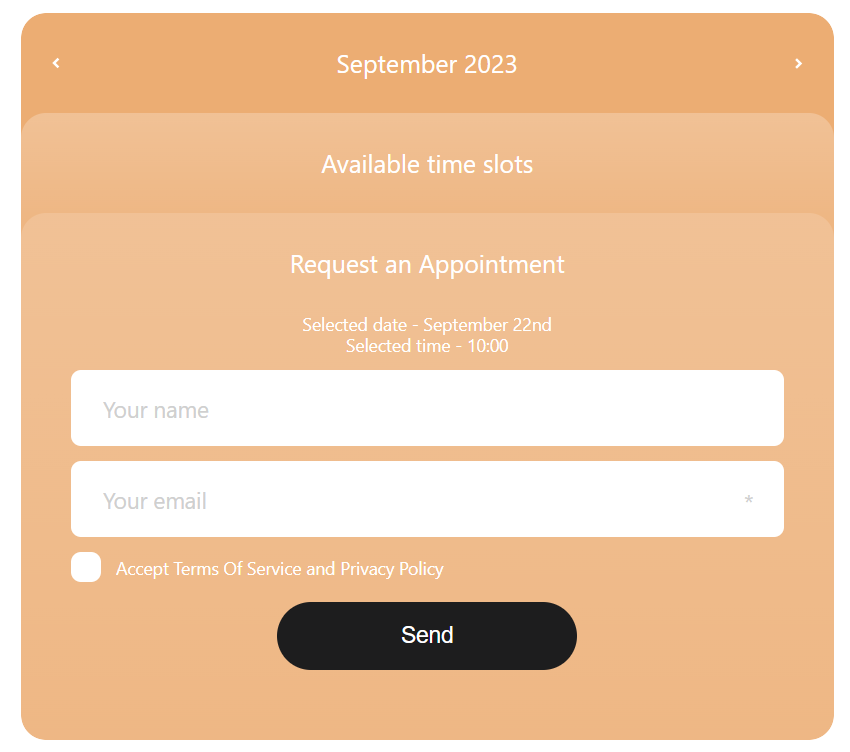
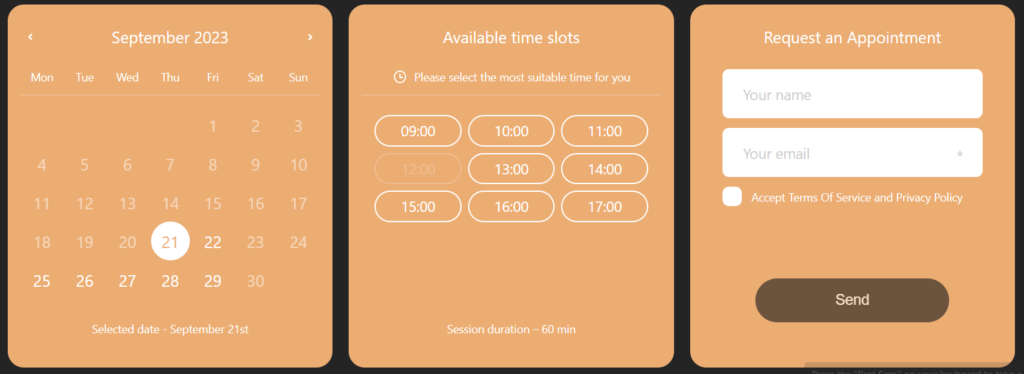
Timecheck collapse
Collecting client applications with a Collapse display view across all devices. The applications are captured by the Timecheck plugin.
1. First collapse
On this collapse customer needs to pick the appointment booking date. Once customer decided the date of appointment, he/she has to click “Available time slots” button to go next collapse.
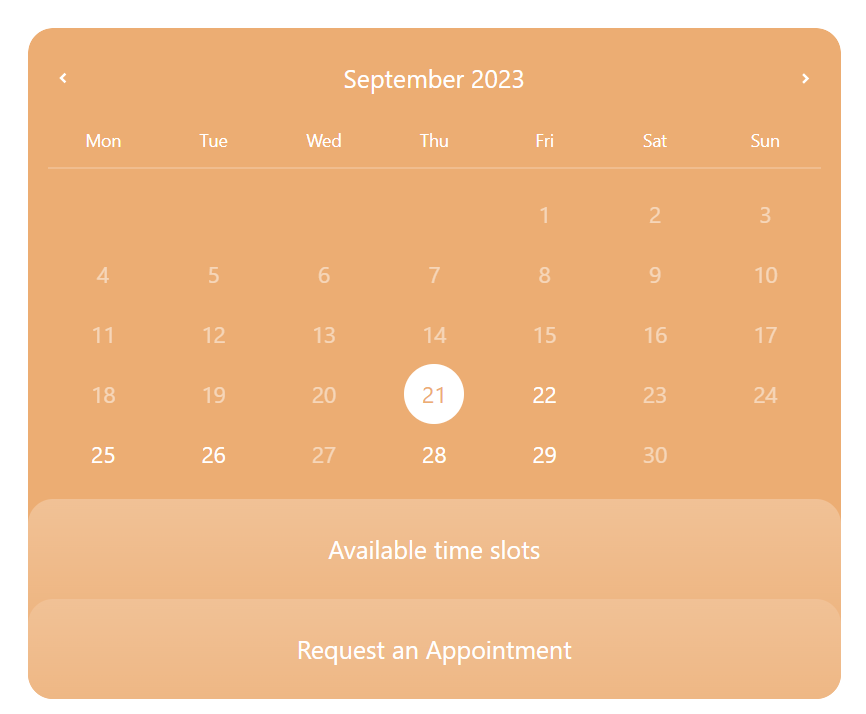
2. Second collapse
On this collapse customer needs to pick the appropriate time for his/her appointment. Once customer decided the time of appointment, he/she has to click “Request an Appointment” button to go next collapse.
3. Third collapse
On this collapse customer needs to fill required form fields for his/her appointment. Once customer done with this collapse, he/she has to click “Send” button to submit the appointment details.
To add/edit form fields, navigate in WordPress Admin Panel Timecheck->Settings->Customazation Forms.
Time settings
This settings includes four time settings of appointments:
- Appointment time range
- Appointment session duration
- The latest available date for appointment
- Last minute appointment protection
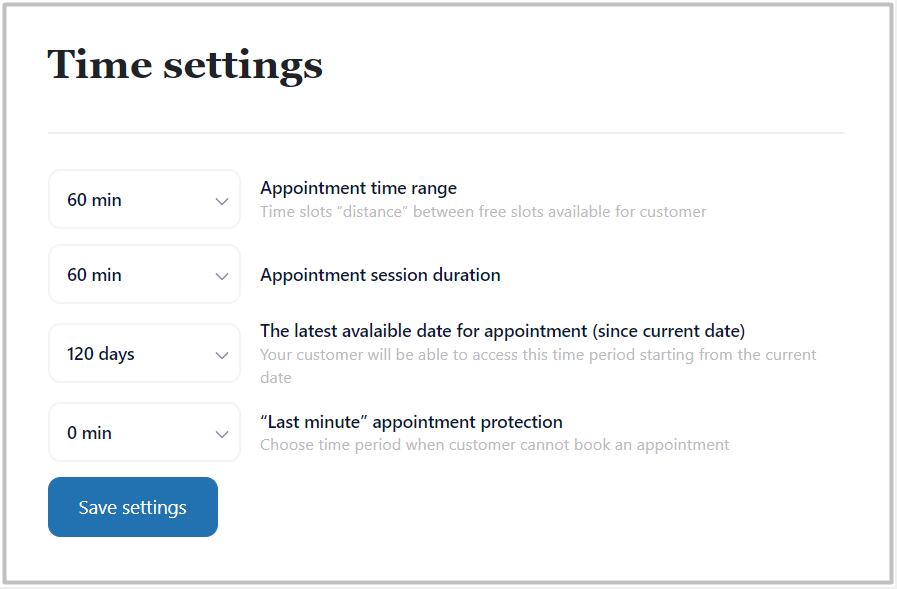
Appointment time range
This setting allows you to edit length for the time slot step, it determines the time slot step in which your appointments can be scheduled.
For example, if you select 20 minutes as the default time slot step, then the working hours will be divided by 20 minutes of timeslots. So appointments can be booked at 9:00, 9:20, 9:40, 10:00, etc (booking after every 20 mins gap).
Appointment session duration
Using this setting, customers can book appointments for services during the default time slot.
As an example, if you select 60 minutes for the time slot step, then the new appointment you are adding will have a default time duration of 60 minutes.
The latest available date for appointment
This option allows you to set time period of you working time since current date. For example: If you set 120 days, it means that customers can book from current date till 120 days ahead of current date.
Last minute appointment protection
Whatever your working time duration will be, working hours will be started according to this settings. it means that if you set 60 minutes your customer will not be able to book appointment within one hours from now and it will protect your first hour from booking.
The results of your settings, you can see on the “Schedule Preview” calender table on the right of the settings.

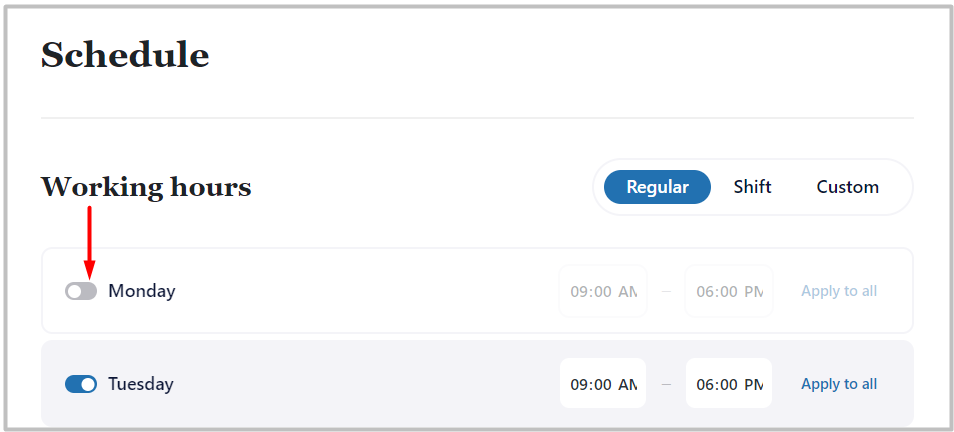
Working Hours Settings
Here you can see all settings related to Working hours options (Schedule). There are three types of working hours: Regulare, Shift and Custom.

Here you can set general working hours and break hours day-wise. You can set the start and end time of working hours from Monday to Sunday. On the day you are not working, just set it OFF by using toggle button.
For the break hours, you can set multiple breaks having a start time and end time. To Add break, click on the “Add” button. It will add new card with start time and end time, with toggler to switch of the break setting.

Once you can set the timings, hit the “Save schedule” button. You will be able to see added breaks under the specific day.
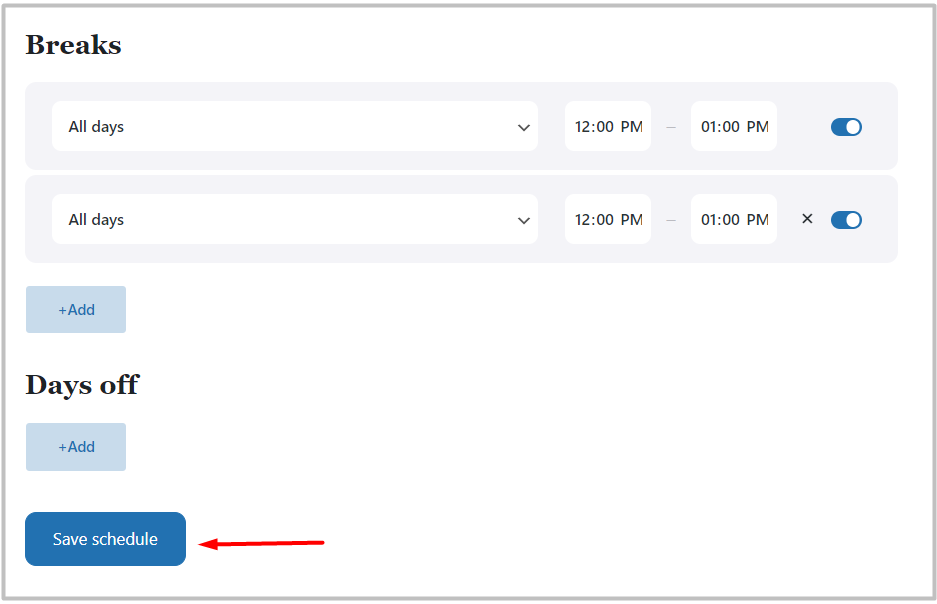
To edit the break hours, click on the break start time and end time inputs and enter break hours as your wish. To delete the break hours, just click on the X icon near break timings and it will delete break hour card.
Shift settings
This setting will allow you to set shift working hours. Here as you can see “Shift work” 1 across 3, it mean you will work 1 day and 3 days off starting with date established below. You can set working time period as well.

Custom settings
Here you ckicking on custom button, you can set custom working hours. In this settings you will find calendar where you can choose working days for one month. All chosen days will be working days with time period set. You wil able to set different time period for each your working day.

Days off (holidays)
You can set the days off (holidays) when you’re on holiday. To add day off, click on “Add” button under the title of “Days Off” in Schedule Settings.

When you click on “Add” button to set a holiday or day off, a calender will be opened. Add the holiday by clicking on the day which you want to set as a day off. Once you have done the settings, click on the “Save schedule” button and it will be set as a holiday or day off (Red in color).
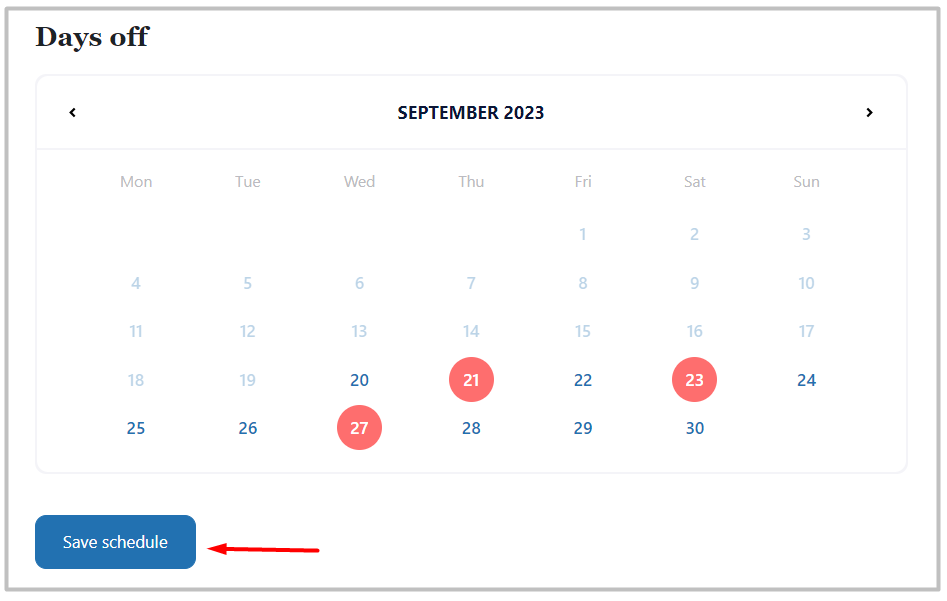
If you want to edit or delete day offs, click on the existing calender and find month or date of day off and click on it, red circle must disapear, it means you have deleted day off from your calender and working hours settings.
List Appointments
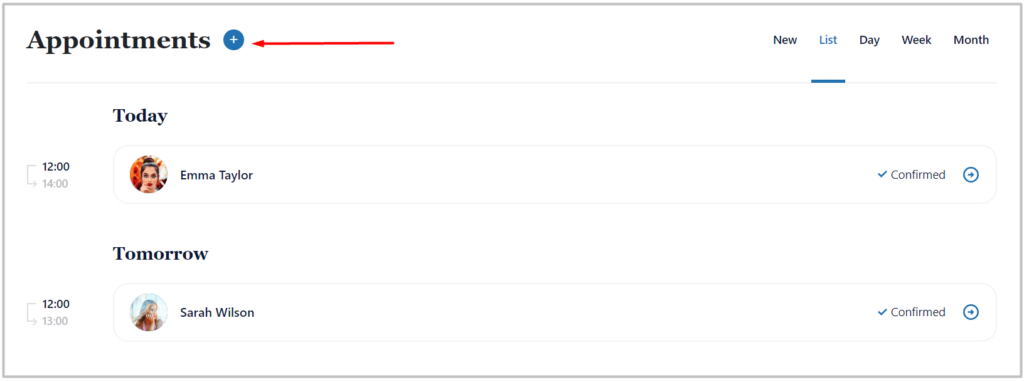
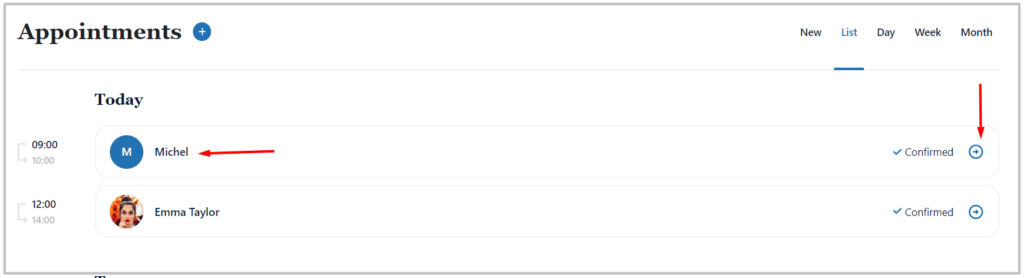
To see list of appoitnments, navigate to TimeCheck > Appointments in WordPress Admin Dashboard.

On this page, you will be able to see all the necessary information about scheduled appointments as a list by default. It shows by default the appointments for the last three days, but if you want to see more you can click on the “Load More” button below the list.

You can change the individual appointments’ status by clicking the appropriate status from the right side of customers list displayed for each appointment.
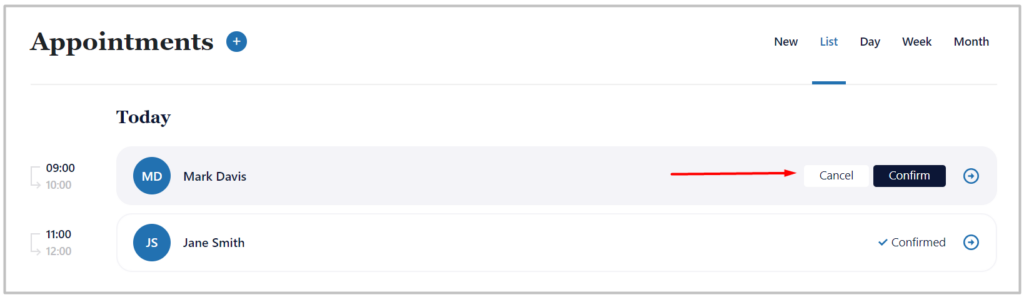
You can also view the details about the Appointment by just clicking on the specific appointment or clicking on the right arrow icon on the right side of the customer appointment list.

.
Timecheck inline
Collecting client applications with a horizontal display view on desktop and Collapse view on other devices. Collapse function will be displayed if the parent container’s width is insufficient. The applications are captured by the Timecheck plugin.
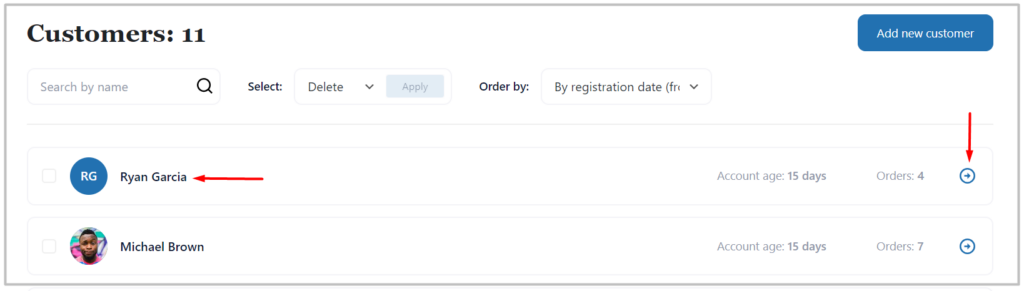
List Customers
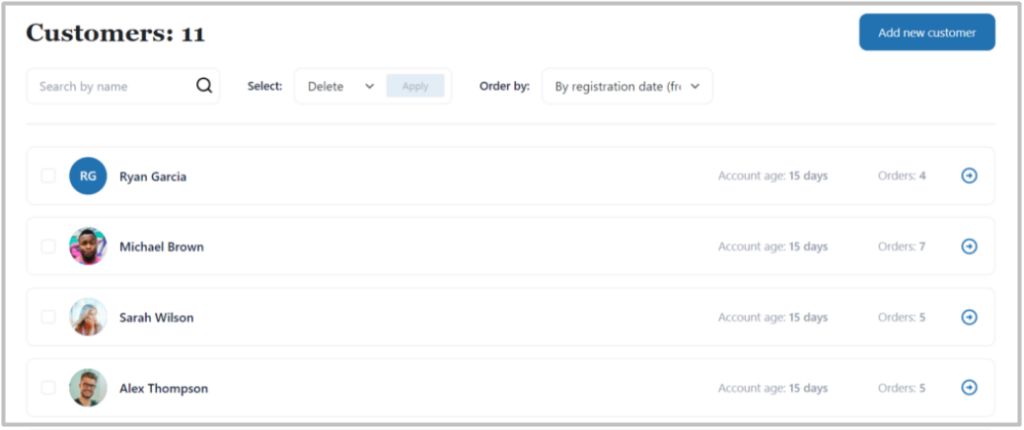
To list customers, you need to navigate to Timecheck > Customers in WordPress Dashboard.

On this page, you will be able to see all the necessary information about customers. With the search bar, you can filter customers by customer name and order your clients using filters “Order by”. Using filters you will be able to see the ucstomers ordered by:
- Registration date (old to new)
- Registration date (new to old)
- Appointments number
- Alphabetical order (from A to Z or from Z to A)
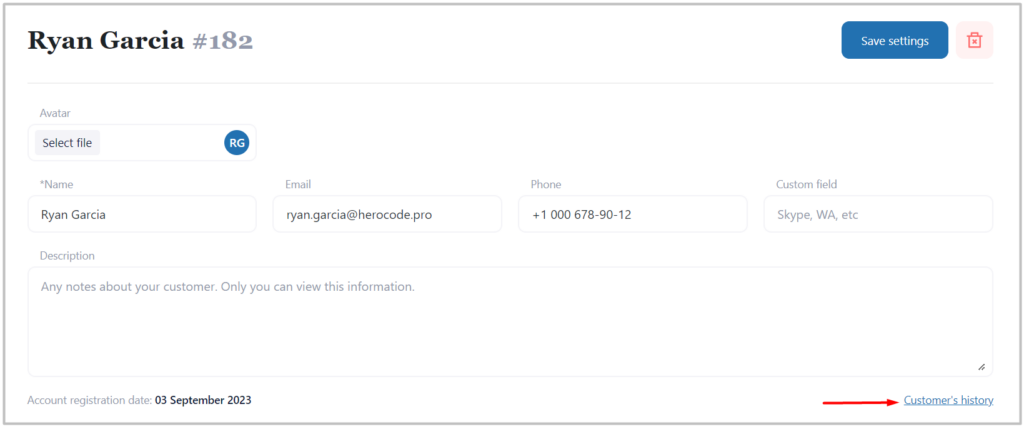
Add/Edit Customers
To create a new customer from the back-end, click on the “Add New” button from the top right corner of the page

and it will open the page with all the necessary details for the customer like Avatar, Name, Email address, Phone number, Custom field, and Description.

To edit an existing customer, just click on client name or right arrow button on the right side of the customer’s list card and it will display new page for editting customers information.
In the “Edit Customer” page you have options to change customers’ Avatar, Name, Email address, Phone number, etc fields.
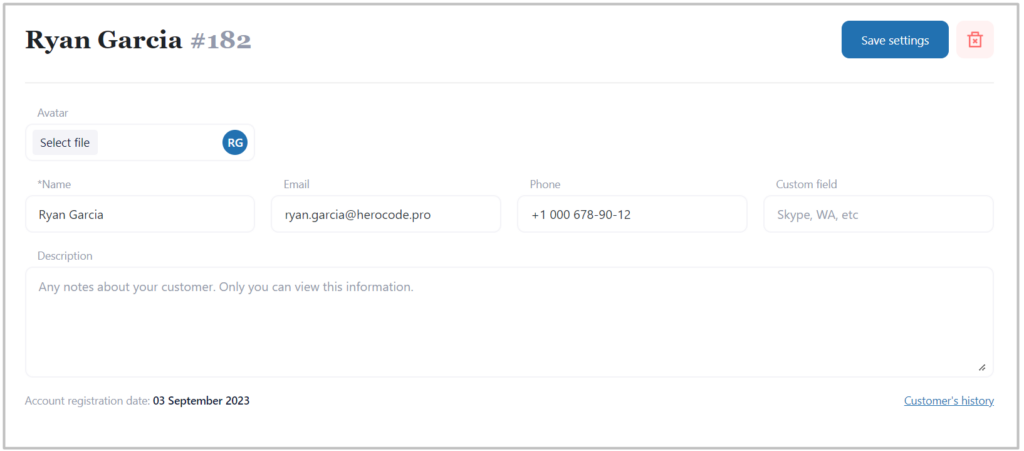
Here, you can find additional information about customers appointments in the below of the above “Edit Form” and navigate that specific appointment and here you can cancel or confirm pending appointments.
So, once you are done with all the changes, hit the “Save settings” button to add or update the customer details.

Delete Customer
To delete a specific customer, you can do it inside customer’s information editting page. On the right of the corner you will be able to find a “Delete” icon.
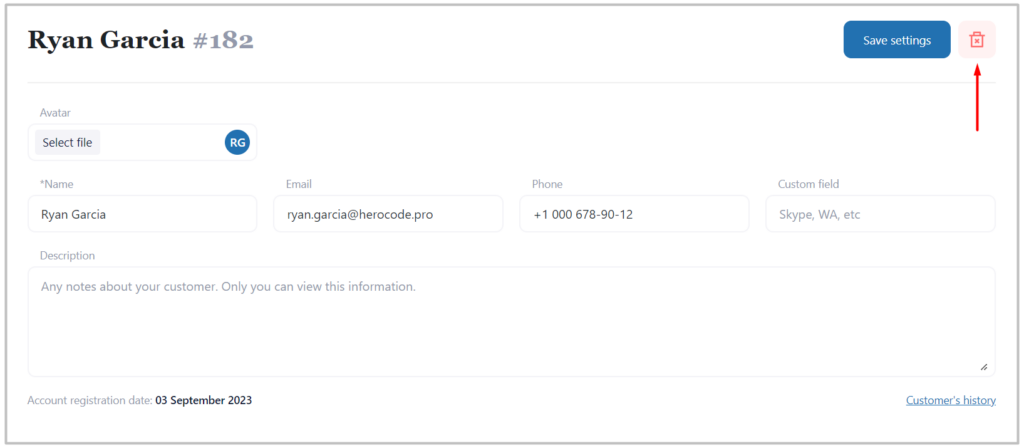
Click on that icon and it will ask for the confirmation to delete. Click on the “Delete” button from the confirmation box and it will delete that customer right away.
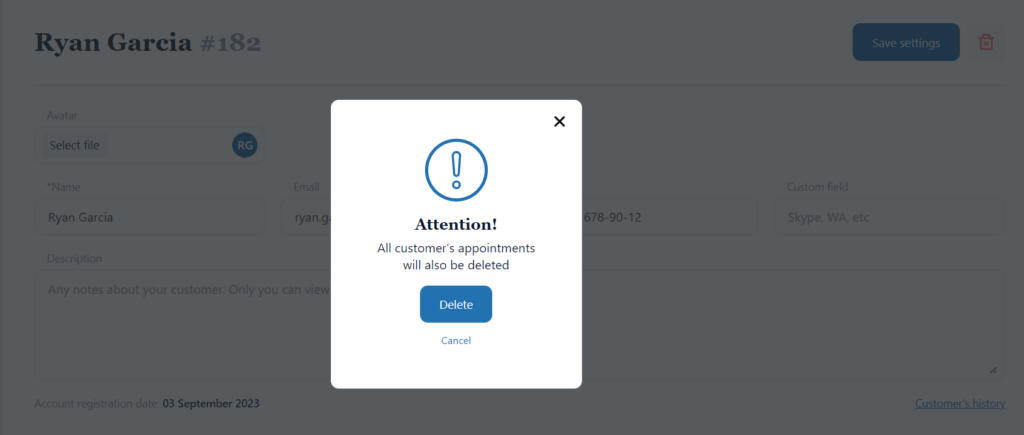
Please note that, if you delete the customer, the system will delete his booked appointments. So, please double-check before deleting the customer.
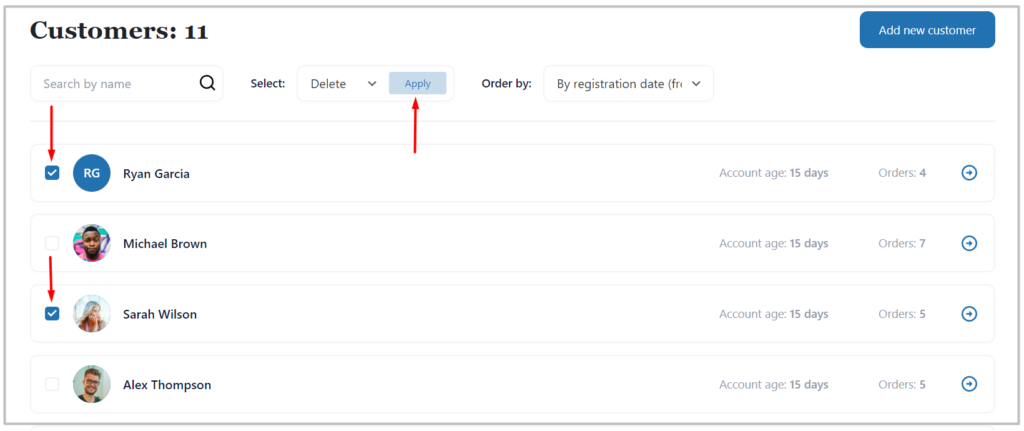
Another way to delete your customer or customers, you can use bulk deletion on the Customer’s List Page. Click the checkboxes on the left side of the customers avatar to select customers to be deleted on the Customers List page and click “Aply” button the header part of the page.
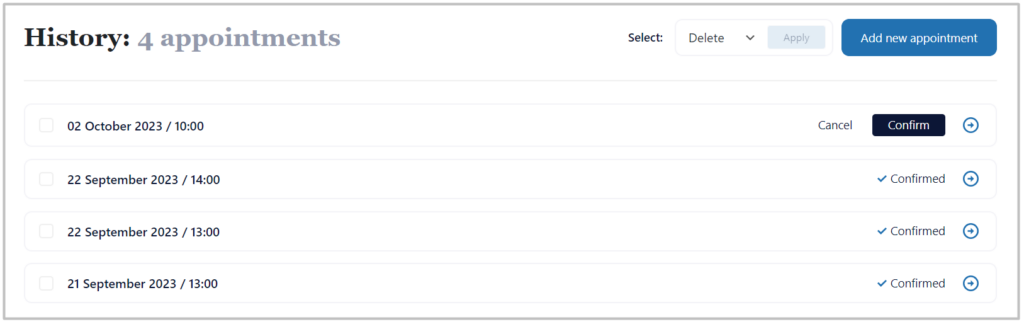
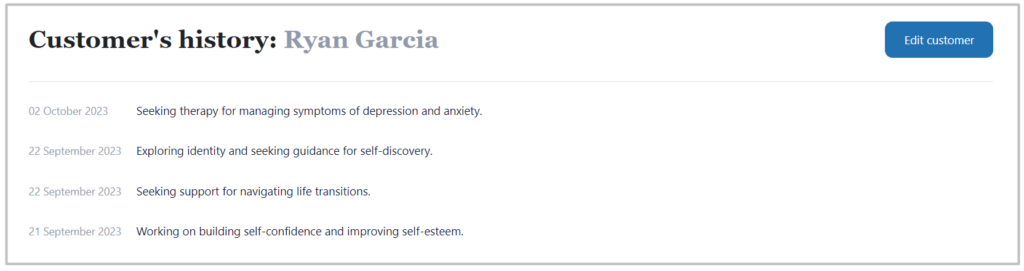
Customer’s history
You can see your customer history on the specific page for that. In order to see your customer’s history you need to click in “Customer’s history” link below the customers “Editting page”.
You customer’s history page will look like this:
Email settings
You can send any email notification that you want to send based on the “Email Settings”. You can write and edit any Email from the “Text Editor”.

1. Appointment Received/Pending
This email notification will be sent immediately to your customer after an appointment is booked from the front end, or a new appointment is created from the back end.
2. Appointment Approved/Confirmed
This email notification will be sent immediately to your customer after an appointment is approved or confirmed by the admin, or a new appointment is created from the back end, and if the default status of the appointment is “Confirmed”.
3. On Appointment Rejection/Cancellation
This email notification will be sent to your customer when an appointment is rejected or canceled by the admin from the back-end.
4. On Appointment Reschedule/Changed
This email notification will be sent to your customer when an appointment is rescheduled or changed by the admin.
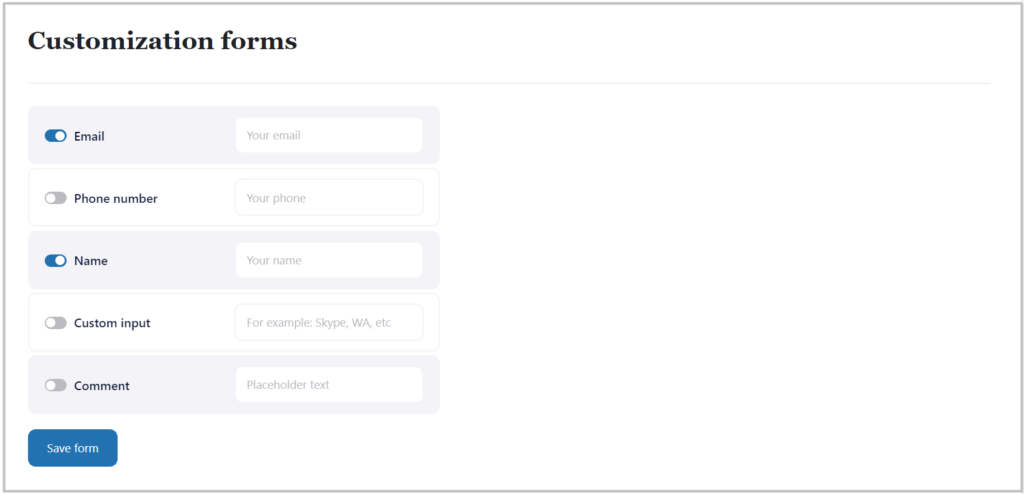
Customazation forms
From here you will get many options to enable/disable form fields according to the requirement, the options are as follows:
- Hide / Show Email field
- Hide / Show Phone number
- Hide / Show Name
- Hide / Show Custom Input
- Hide / Show Comment field
Installing Plugin
You need to follow very simple steps for getting started with Timecheck.
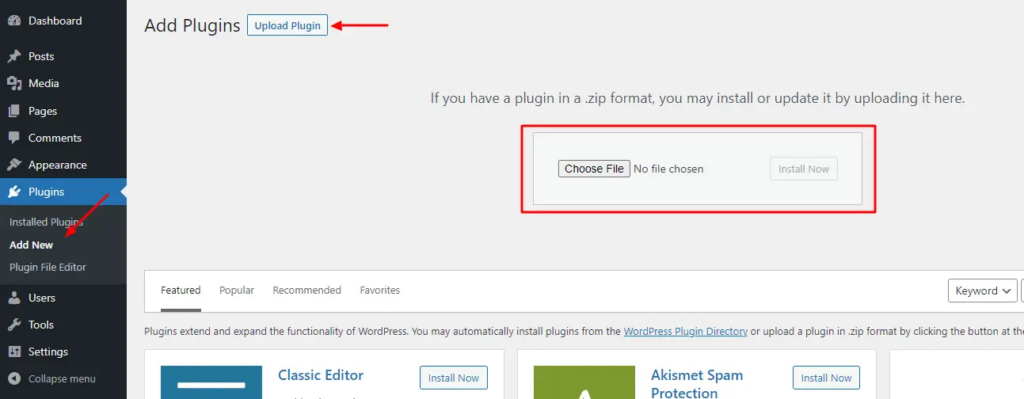
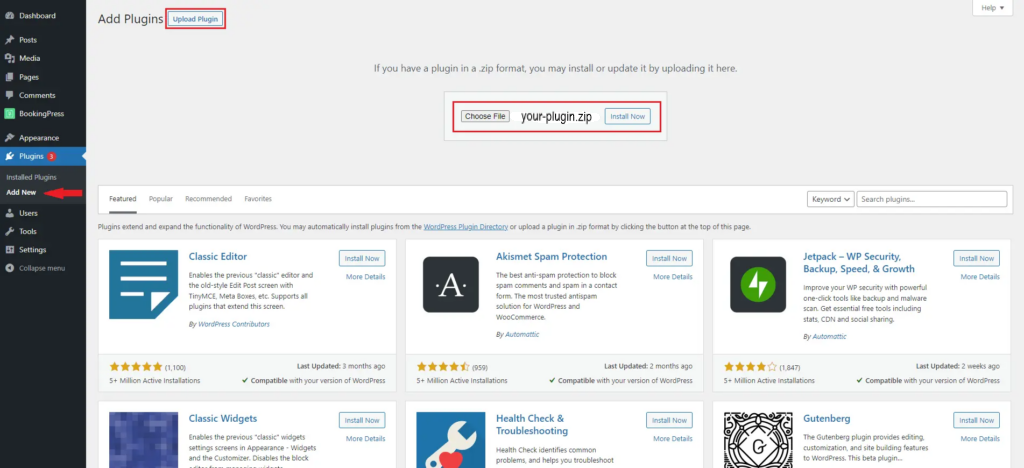
- Now to install the plugin via WordPress Uploader: In your WordPress admin, go to
Plugins > Add New > Uploadand upload the available ZIP of Timecheck to install the Plugin. - Manual Installation :
- Download the latest version of the Timecheck plugin.
- Unzip the downloaded file to your computer.
- Upload the Timecheck directory after unzipping the plugin to the
/wp-content/plugins/directory of your site. - Activate the plugin from the ‘Plugins’ menu in WordPress.
Updating plugin
Important: Whether you update Timecheck manually or automatically, we recommend you backup your website data before making any updates. Read more about WordPress backups here.
There are two ways to update the plugin:
1. Auto Update:
- In your WordPress admin, go to
Plugins > Installed Pluginsto update Timecheck Plugin directly from an available update link for Timecheck.
2. Manual Update Using WordPress Installer:
- Download the latest version of the Timecheck from the website from where you have purchased or contact support team in https://herocode.pro website.
- Now to update the plugin via WordPress Uploader: In your WordPress admin, go to
Plugins > Add New > Uploadand upload the available ZIP of Timecheck and click on the Install button.
3. Manual Update via FTP:
- Download the latest version of the Timecheck from source.
- Unzip the downloaded file to your computer.
- Upload the new plugin source code Timecheck directory after unzipping the plugin to the /wp-content/plugins/ directory of your site.
- Refresh the Timecheck admin pages to confirm the update.
Filter Appointments
You can also filter appointments by setting the date range you require in “Day”, “Week”, “Month” tabs, selecting from the available tabs at the top of the page.
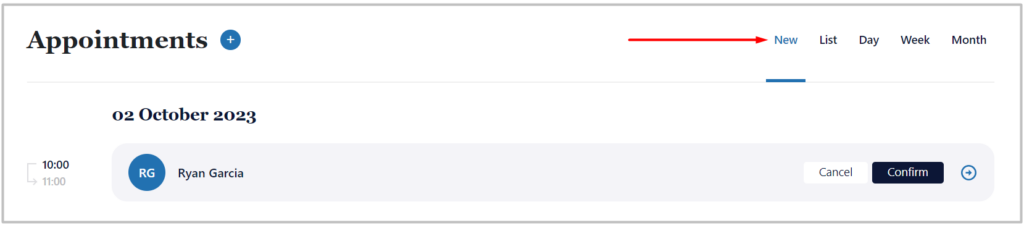
New appointments
In the appointments page, click on “New” to see all newly added appointments. From here you can view the appointment’s details and change the appointment’s status.
Dayly view of appointments
Appointments divided into time ranges within a day are displayed on a daily view page. You can use drag-and-drop functionality to change the appointed time within a day.

In the day view of appointments, you can find an add appointment button to “add a new appointment” within that time range.

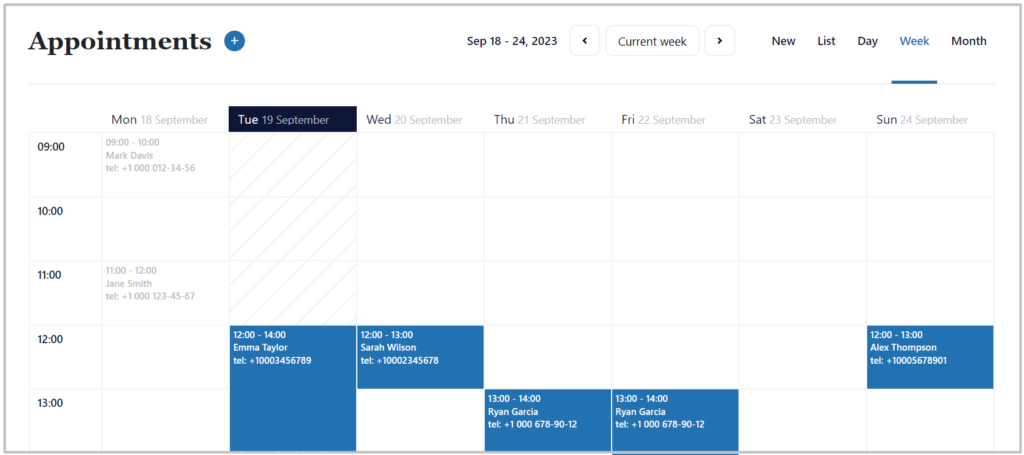
Weekly view of appointments
You can manage all your appointments within a week by clicking on the “Week” tab. For convenience, the week view page also contains tabs or navigations to move to previous or following weeks.
Monthly view of appointments
can find all appointments which are past or for coming period of time. There are options to navigate to see other months appointments by clicking on left and right arrows on the top of the page.

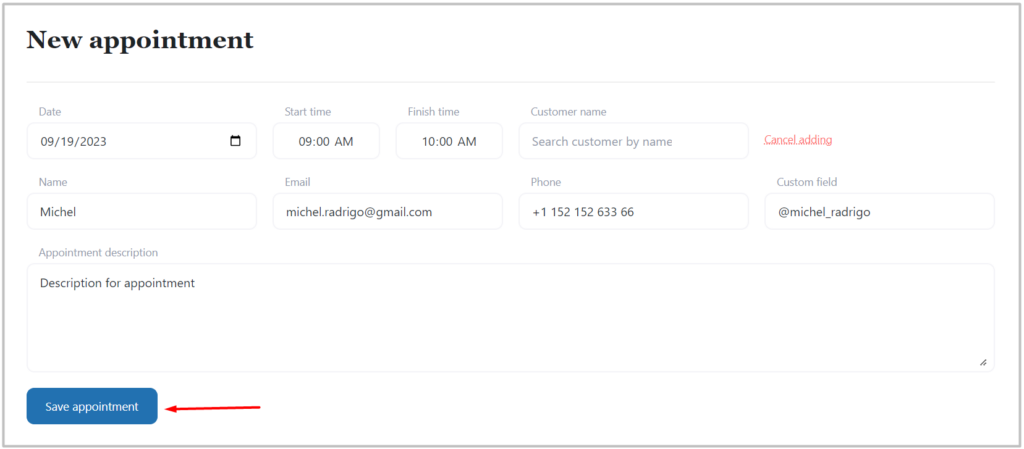
Add Appointment
To schedule a new appointment from the back-end, click on the “Add New” button from the top left corner of the page and it will open a page with all the necessary details for the appointment.
Choosing “Customer” from the dropdown will allow you to book an appointment and then selecting the start time and end time for your appointment. You can also add an appointment description (if any).
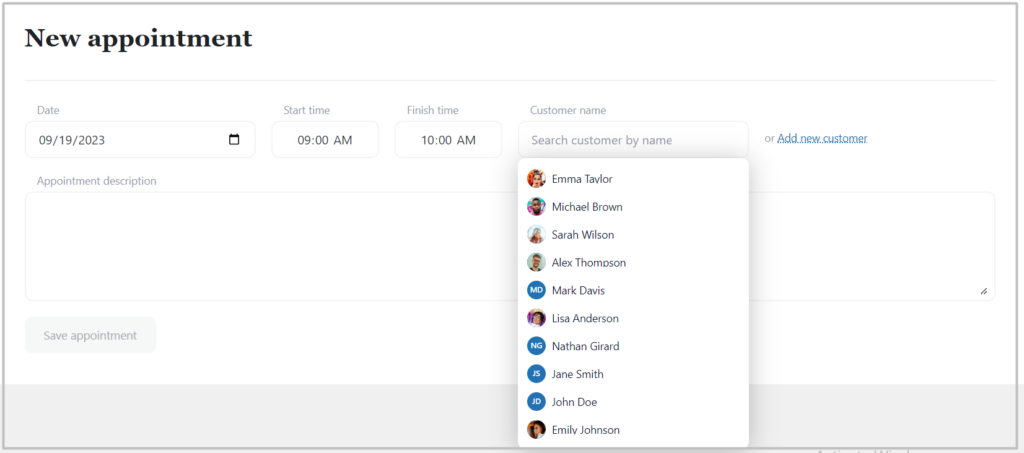
Adding a new customer to your appointment can be done by clicking on the “Add new customer” button.
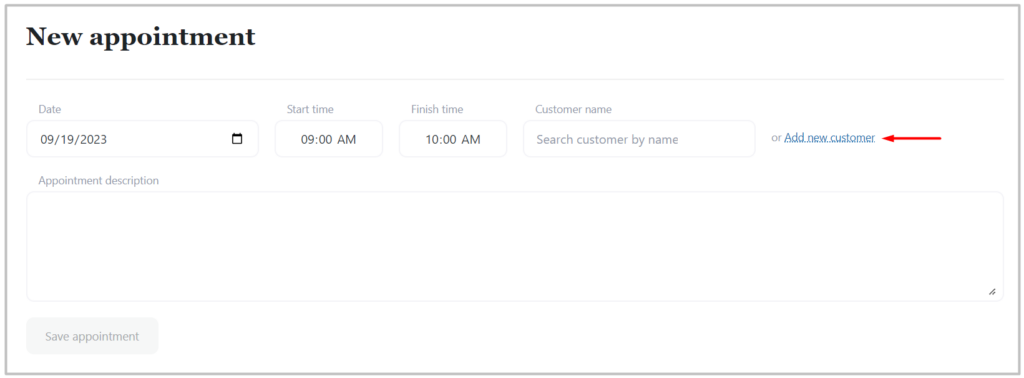
Upon clicking the “Add new customer” link, additional fields will appear for your custom, which automatically adds your new customer to the customer list.
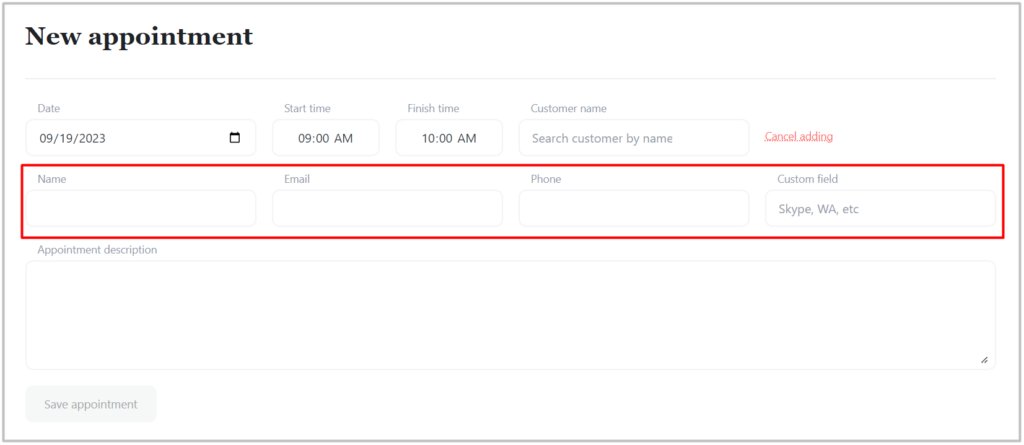
After selecting appointment date, start time and end time will be filled with available and with free time period for that day according to your settings set in “Setttings” page.
After filling all required data for your appointment, click “Save appointment” button to add to appointment list or scheduled time period. Your appointment added through admin will bew saved with “confirmed” status.
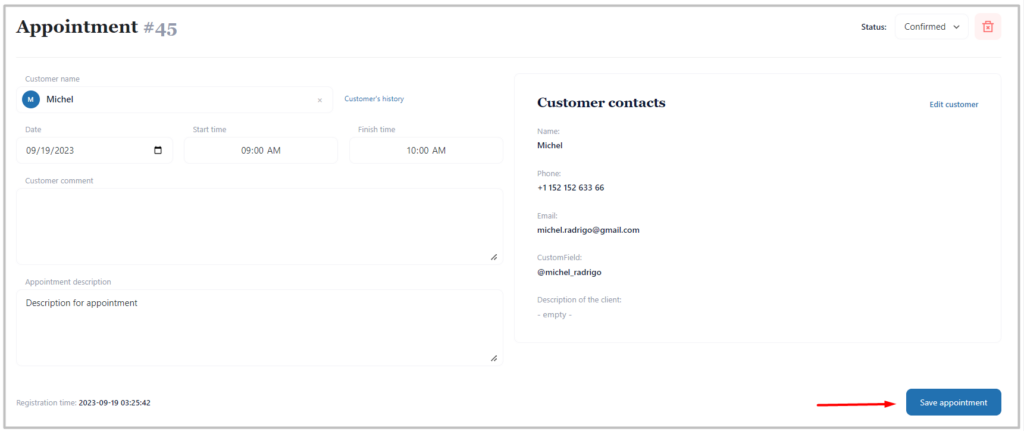
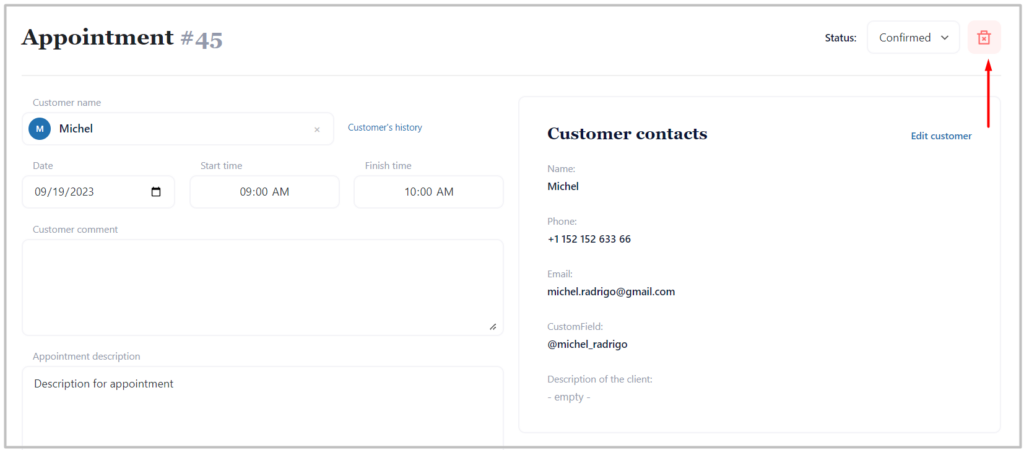
Edit Appointment
Sometimes it happens that you need to make changes to an existing appointment. Maybe the customer needs to reschedule his appointment or you want to make any edits according to your schedule.
To edit an existing appointment, just click over any individual appointment’s name or arrow icon on the right of the appointment card and it will display edit page for appointment.

Editor page for appointment will look like this:
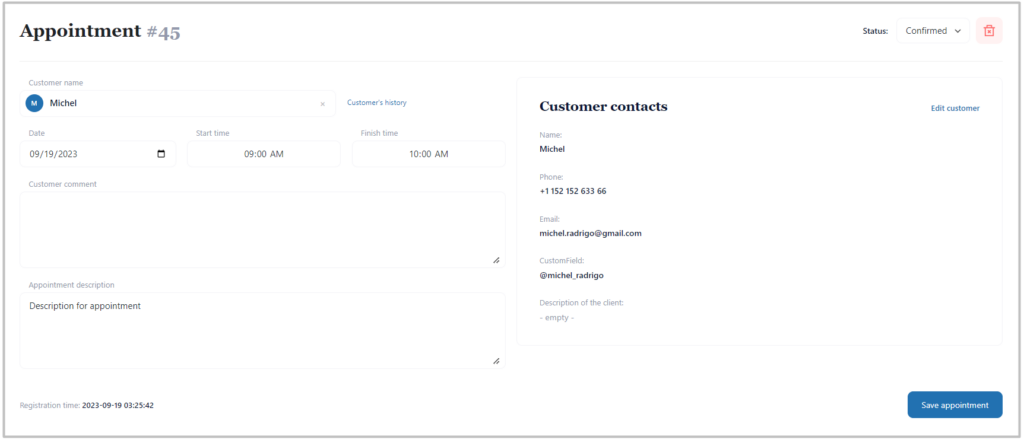
In the “Edit Appointment” page you have options to reschedule the appointment, change appointment booking status, change the customer, etc.
If you change the date, you may see that the selected time slot is not available. If this occurs, simply select a different time slot. After editting sand saving the appointment, it will notify the customers about the changes in the appointments by email as per your settings made in “Settings” page.
So, once you are done with all the changes, hit the “Save appointment” button to update the details.
Quick Start Guide
Starting to work with the TimeCheck is easy. All you need to add Gutenberg block on the booking page and you can start using booking forms.
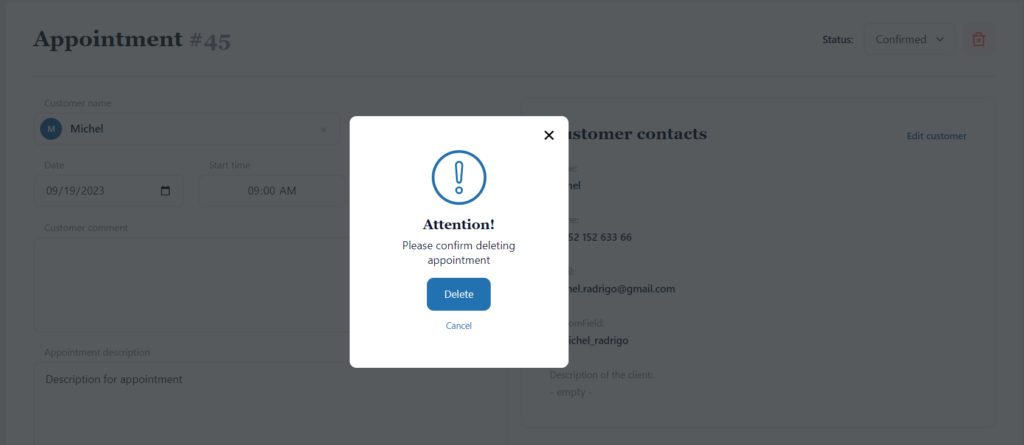
Delete Appointment
To delete a specific appointment, you need to go appointment editing page by clicking on the name or icon on the right side of the appointment card in Appointments page.
It will open an appointment editting page that has a “Delete” icon on the top right corner.
Click on that icon and it will ask for the confirmation to delete. Click on the “Delete” button from the confirmation box and it will delete that appointment right away.
Pending Appointments
You can see how many pending or new appointments there are in WordPress Admin besides Timecheck and Appointments menus. Whenever someone requests an appointment on your website, you will be able to see number of new or pending appointments directly in Timecheck menu in WordPress Admin.
As per your settings in the “Settings” page, you will automatically receive a notification when someone leaves a request for an appointment on the website.
To see the list of the new or pending appointments, you need to navigate Timecheck > Appointments and on that page click on “New” tab on the top right corener of the page. Here, you can directly change appointment status to “Cancel” or “Confirm” it by clicking corresponding button.

Another option to change the status of appointment to go to edit page of the appointment by clicking name or right arrow icon on the right side of the appointment card.

In the edit appointment page you will be able to find dropdown on the top right corener of the page to change status of appointment. After changing the status in edit page you have to click “Save appointment” button on the botom of the page.
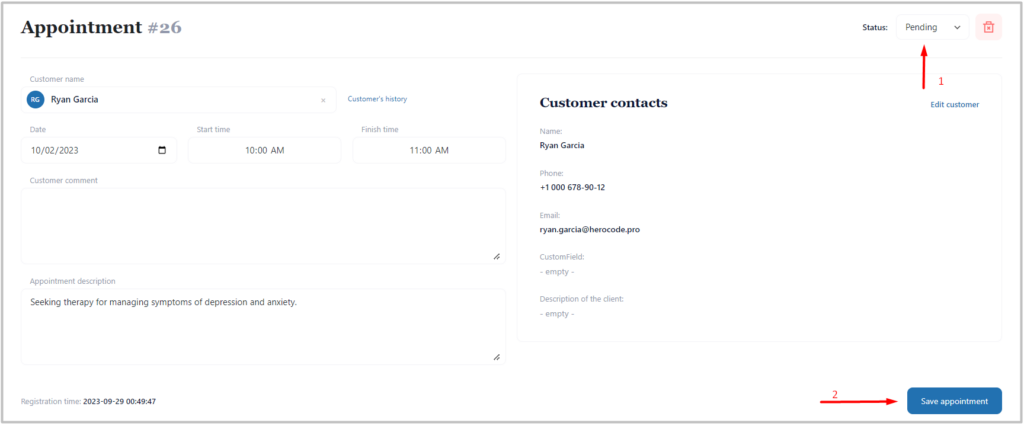
Confirm Appointment
By default, all appointments added via WordPress Admin Panel have the status “confirmed”.
To confirm an appointment coming from frontend of your website, you need to navigate Timecheck > Appointments and on that page click on “New” tab ( to cancel newly added appointments) or “List” (where you will be able to find all your appointments), on the top right corener of the page. Here, you can directly change appointment status to “confirmed” by clicking “Confirm” button.

Another option to change the status of appointment is to go to edit page of the appointment by clicking name or right arrow icon on the right side of the appointment card.
In the edit page you will be able to find dropdown on the top right corener of the page to change status of appointment. After changing the status in editting page you have to click “Save appointment” button on the botom of the page.

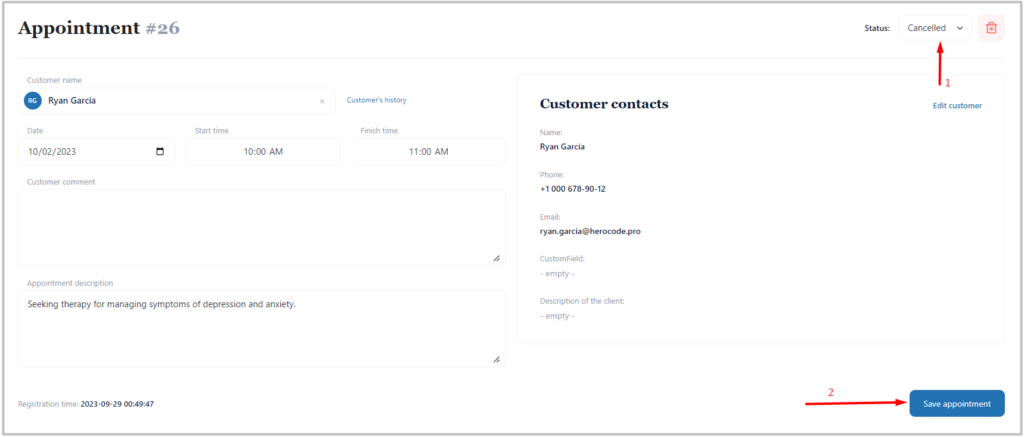
Cancel Appointment
To cancel an appointment, you need to navigate Timecheck > Appointments and on that page click on “New” tab ( to cancel newly added appointments) or “List” (where you will be able to find all your appointments), on the top right corener of the page. Here, you can directly change appointment status to “Canceled” by clicking “Cancel” button.

Another option to change the status of appointment is to go to edit page of the appointment by clicking name or right arrow icon on the right side of the appointment card.
In the edit page you will be able to find dropdown on the top right corner of the page to change status of appointment. After changing the status in edit page you have to click “Save appointment” button on the bottom of the page.
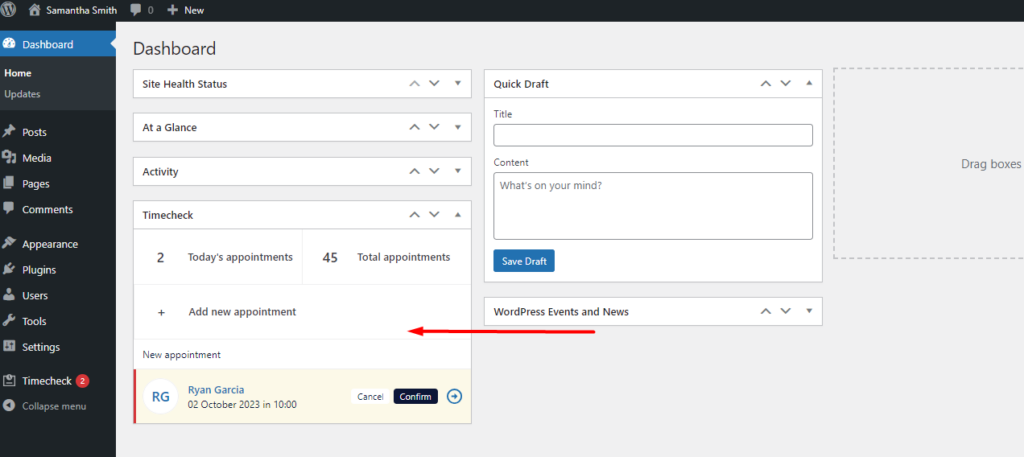
Dashboard
In the WordPress Admin Dashboard, there is a Timecheck box that shows the number of appointments for today, the total number of appointments, and the number of new appointments. You can also add new appointments by clicking “Add new appointment” and confirm or cancel pending appointment requests of your customers.
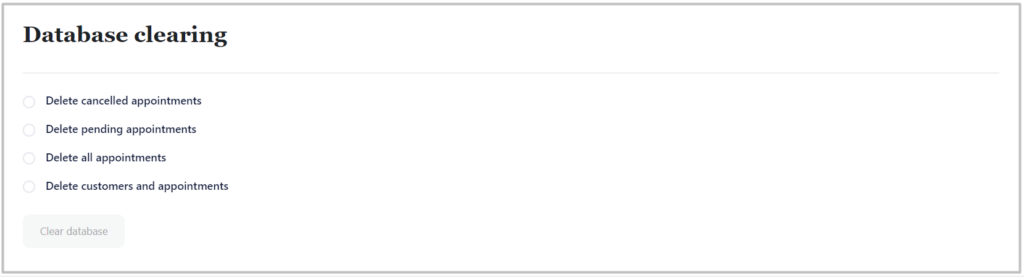
Database clearing
For your convinience we have setings to clear your database from unwanted data. In order to clear data, choose one of the availbale clearance options:
- Delete cancelled appointments
- Delete pending appointments
- Delete all appointments
- Delete customers appointments
Once you have chosen the data to be deleted, click “Clear Database” button and Timecheck clear the database the unwanted data.